SeedVR2 side-by-side image comparison
Each prompt example is followed by one matched row: the Krea2 source, the SeedVR2 3B result, and the SeedVR2 7B result. The comparison images are placed throughout the article rather than collected in one block.
This test compares SeedVR2 3B vs SeedVR2 7B portrait upscaling on the same 1024px Krea2 Turbo portrait source image at 2x. I ran both versions under matched settings, then checked the results side by side at full resolution and in tight crops around hair strands, eyelashes, skin pores, fabric texture, and clean background edges. The short version: 7B delivered the more reliable final portrait file, but 3B stayed useful when I wanted a lighter, faster pass that still held enough detail for general gallery use.
Quick answer
- Use SeedVR2 7B if the portrait will be inspected closely, especially around flyaway hair, eyelashes, pores, and clothing weave.
- Use SeedVR2 3B when speed and lighter resource use matter more than maximum micro-detail recovery.
- The most important test method is simple: inspect the same original image side by side after 3B and 7B upscaling.
- In this run, 7B preserved edge stability better in hairlines and lashes, while 3B was more likely to look slightly sharpened rather than naturally reconstructed.
- Before publishing, check for oversharpening, pore exaggeration, stray haloing, and any text or logo distortion risk on garments or accessories.
What was tested
I used one uploaded Krea2 Turbo portrait source image with the same conditions for both outputs:
- 1024px input portrait
- soft studio light
- natural skin
- strong hair detail
- detailed fabric texture
- clean background
- identical 2x upscale settings in SeedVR2 3B and SeedVR2 7B
The review method was practical rather than synthetic. I compared:
1. Full-frame impression 2. Hairline and loose strand crops 3. Eyelash and iris-edge crops 4. Cheek and forehead texture crops 5. Clothing texture crops 6. Background edge transitions
For readers testing their own files, the easiest place to repeat this is inside [the upscaler](/upscaler), then keep matched results in a review set in [the gallery](/gallery).
Why this portrait case is harder than it looks
Portrait upscaling at 2x sounds mild, but it exposes a model very quickly. Hair strands are thin, irregular, and layered. Eyelashes need separation without turning into dark spikes. Skin pores need to appear present but not stamped on. Fabric weave can easily become fake micro-noise. A clean studio background is also useful because any edge instability around the subject shows up immediately.
That is why SeedVR2 3B vs SeedVR2 7B portrait upscaling is not just about sharpness. The real question is whether the model reconstructs believable detail without inventing texture that breaks the face, the styling, or the delivery file.
First pass: what the side-by-side revealed
My first pass was deliberately boring: same source image, same 2x upscale, no changes except model choice. That is the comparison most readers actually need.
At full image view, both outputs looked usable. If I had only glanced at the frame on a phone, I could have called the result a draw. The gap opened up only after moving into crops.
On the left, SeedVR2 3B looked competent but slightly more procedural. It added perceived crispness fast, especially in clothing seams and outer hair contours. But in the close facial areas, that crispness sometimes looked like enhancement rather than recovery.
On the right, SeedVR2 7B looked calmer. It usually held lash separation better, kept loose hair from clumping as often, and retained skin texture with less of the etched look that upscalers can introduce when they chase detail too aggressively.
Fast comparison table
| SeedVR2 3B | SeedVR2 7B | |---|---| | Faster decision pass | Better final delivery pass | | Good perceived sharpness | Better natural micro-detail | | Slightly higher oversharpening risk | Better edge reconstruction | | Lighter practical run profile | Heavier but more reliable for close inspection | | Fine for general portraits | Better for beauty, fashion, and crop-sensitive work |
The adjustment that improved the review, not the model
The biggest improvement was not changing the upscale factor. It was changing how I inspected the result.
Instead of judging the portrait at fit-to-screen, I reviewed it in a fixed sequence:
- hairline first
- outer eyelashes second
- upper cheek skin texture third
- collar and fabric weave fourth
- background-to-shoulder edge fifth
That order made the trade-offs obvious. 3B often looked good on the first impression but lost confidence under micro-crop review. 7B sometimes appeared less aggressively sharp at a glance, yet it held together better once the image was pushed to close inspection.
If you want to repeat that workflow, a simple prep route is to save variants from [Create](/create), compare prompt notes in [PromptLab](/promptlab), and then run matched upscale tests before final selection.
SeedVR2 3B: mobile admin brief
This section is intentionally compact, because 3B is the version I would use for quicker decision-making.
What 3B answers quickly
1. Is the source image strong enough to upscale at all?
Usually yes. In this test, 3B was good enough to tell me whether the Krea2 Turbo portrait had a solid detail base. Hair silhouette, garment boundaries, and overall face readability survived the 2x step well.
2. Is it publishable without close crop scrutiny?
Often yes. For standard gallery viewing, 3B held enough detail to work. If the portrait is not headed for beauty-level inspection, 3B may already be sufficient.
3. Where does it start to slip?
Close facial crops. The weak point was not obvious failure. It was a slight synthetic edge character: a touch more bite in eyelashes, a slightly more carved look in pores, and occasional strand grouping in difficult hair sections.
3B strengths
- Fast practical option for general portrait upscaling
- Good broad sharpness on fabric folds and subject outline
- Useful as a first-pass filter before spending time on 7B
- Acceptable final result when the portrait will be viewed at normal size
3B risks to inspect
- Eyelashes becoming too dark or too uniform
- Hairline halos against a clean background
- Skin pores looking emphasized instead of naturally present
- Small logos or text on garments drifting into brittle shapes
Compact decision table
| Check | 3B result in this test | |---|---| | Hair strands | Fair to good, but some clumping in finer areas | | Eyelashes | Clear enough, sometimes slightly harsh | | Skin pores | Visible, but can lean etched | | Fabric texture | Strong perceived sharpness | | Background edges | Mostly stable, occasional crisp halo risk | | Final-gallery confidence | Moderate |
This was the version I would keep for quick throughput, draft galleries, or broader portrait sets where not every frame needs maximum micro-detail fidelity.
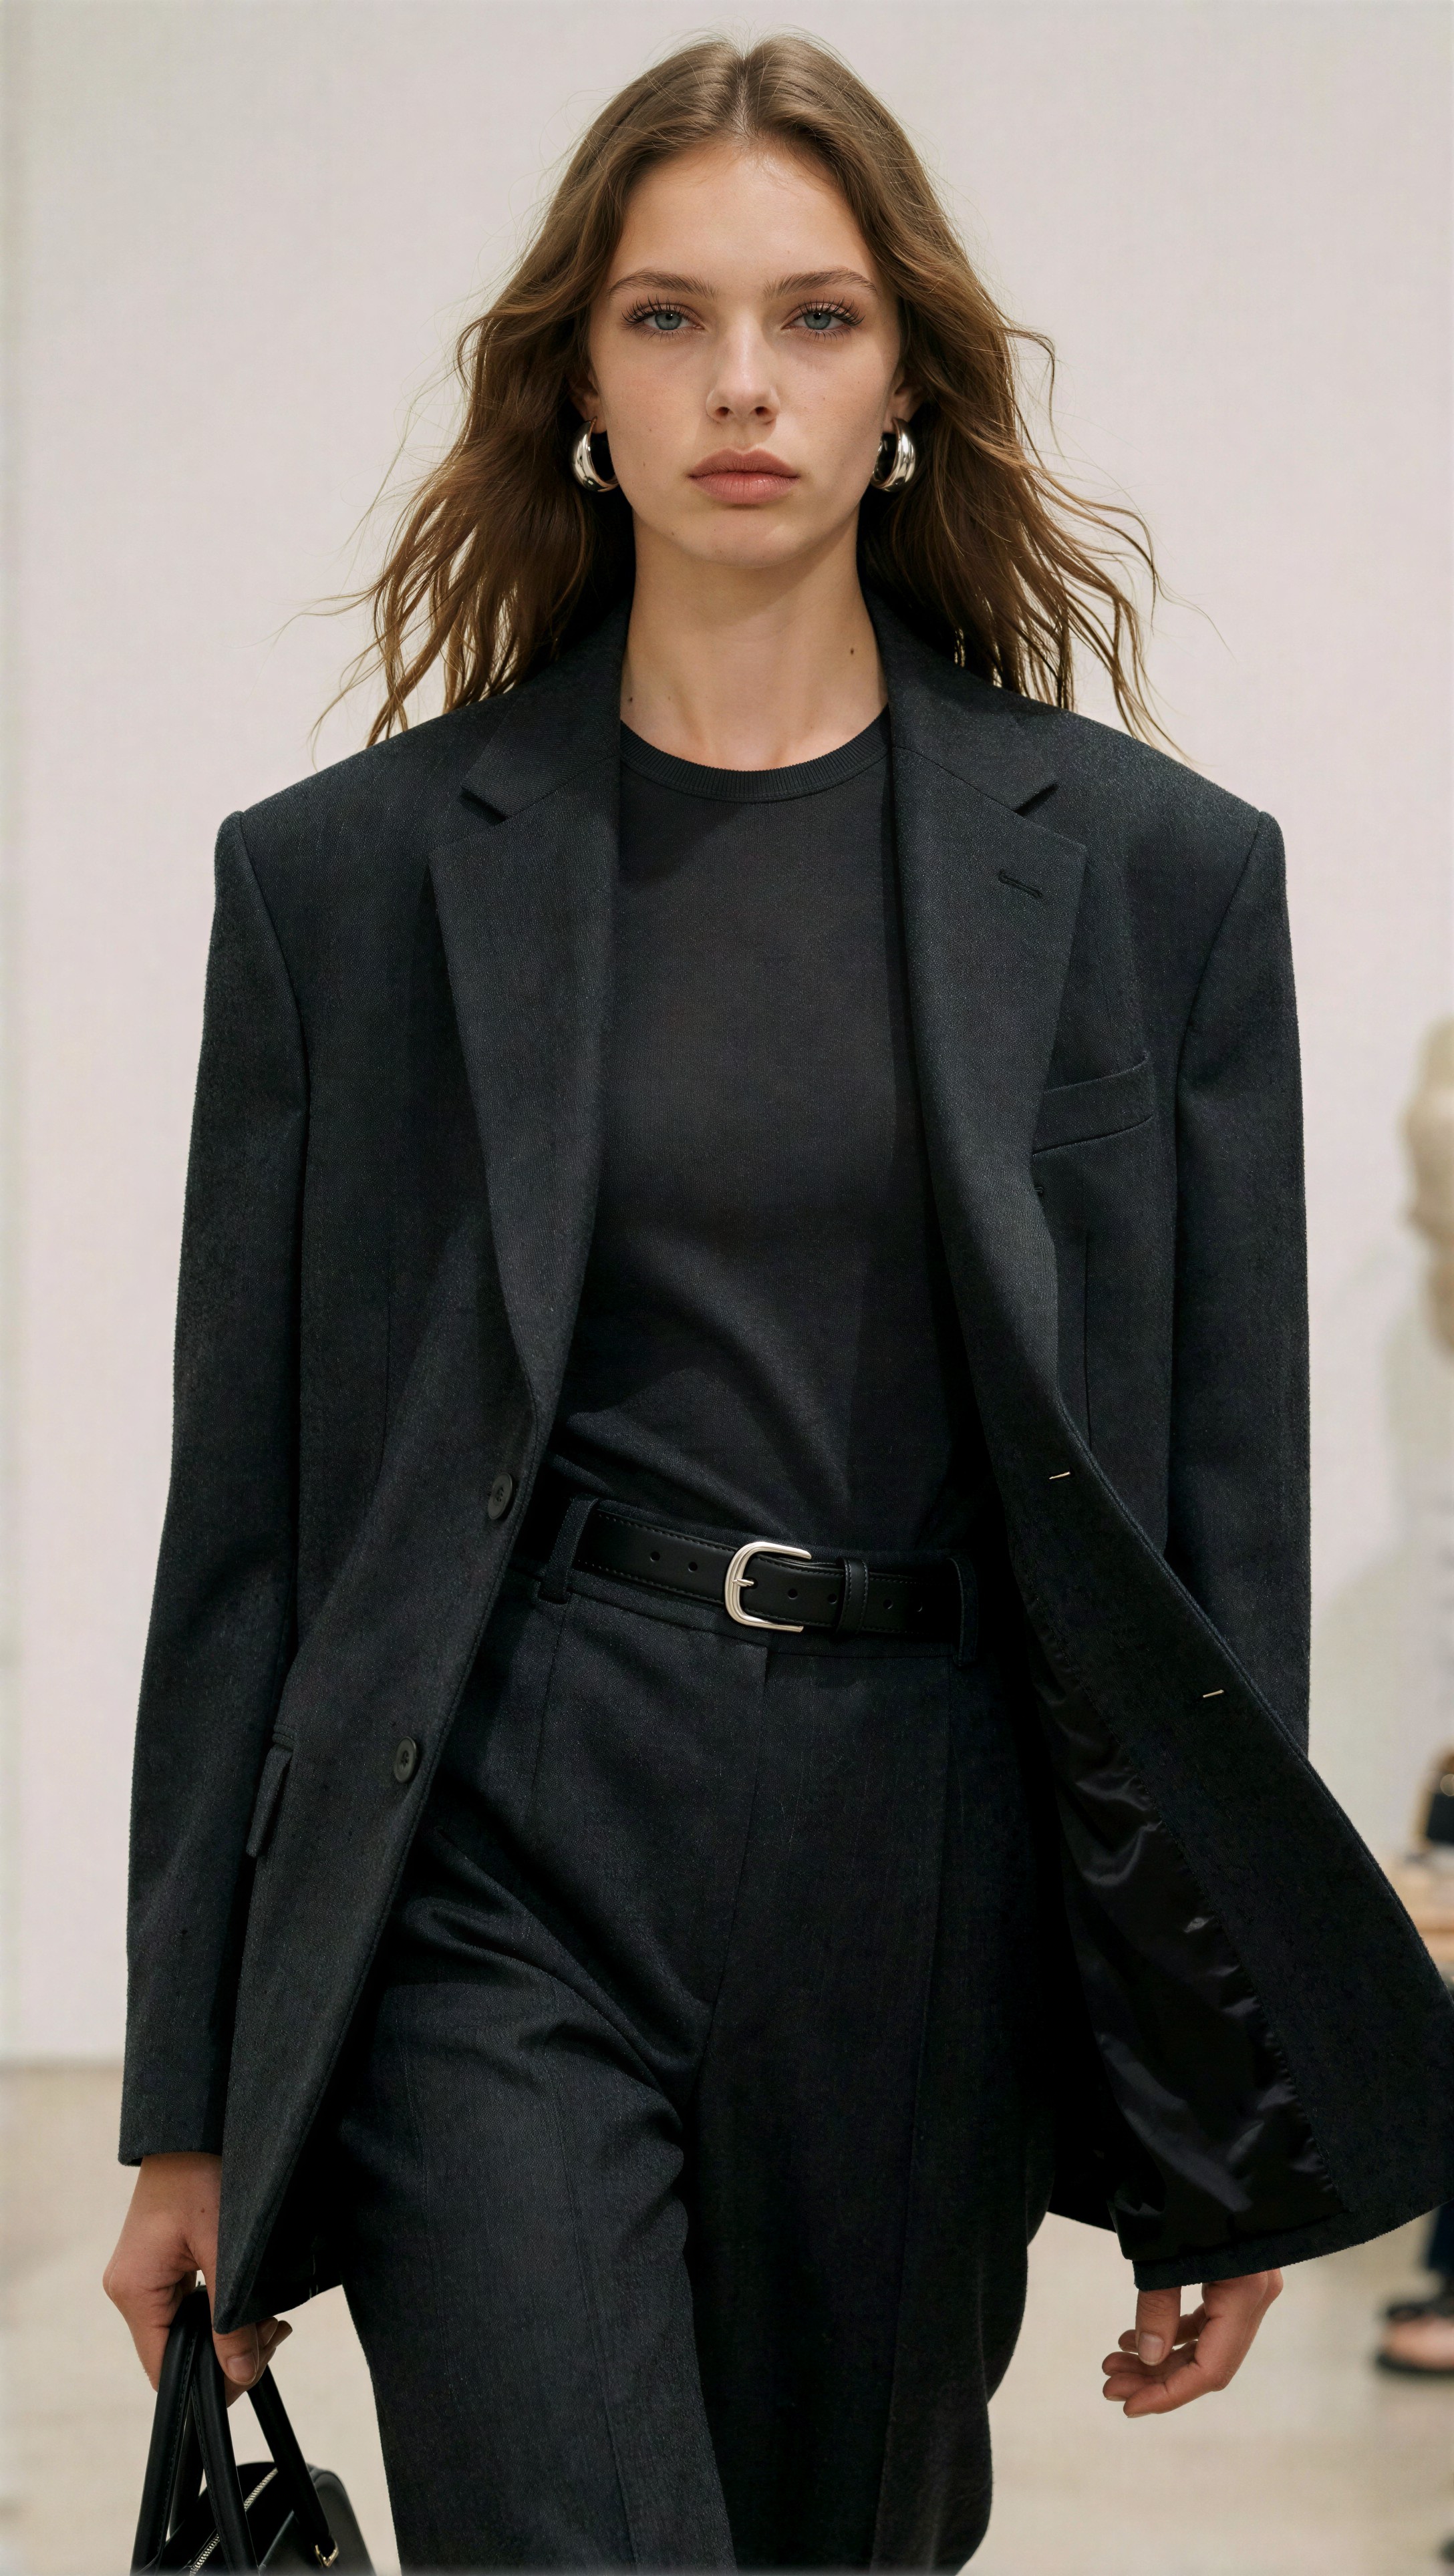
This first prompt test was useful for checking whether layered outfit texture survives the source render before upscaling. I used a styling-heavy portrait because it gives the upscaler more chances to fail around hair, lapels, and woven cloth.
Topic: Trend-led portrait editorial with layered tailoring and flyaway hair
Genre: Fashion Editorial
Camera: Sony A7R V
Lens: 50mm f/2
Lighting: Softbox key light with gentle fill
Location: Clean studio set with pale neutral backdrop
Style: Modern luxury fashion campaign
Final Prompt: three-quarter outfit editorial portrait of a model wearing a structured charcoal blazer over a fine rib knit top, tailored trousers, slim leather belt, minimal silver earrings, controlled but natural flyaway hair around the temples, soft studio light, clean pale backdrop, calm direct expression, visible lapel texture, natural fabric folds, editorial framing that keeps hairline, eyelashes, cheek texture, and garment weave readable, refined color separation, realistic styling details, polished magazine composition
Comparison image 1
The same Krea2 source image is used for both outputs: SeedVR2 3B on the left and SeedVR2 7B on the right.
| Krea2 source | SeedVR2 3B output | SeedVR2 7B output | | --- | --- | --- | | !Krea2 source Test 1 · manual-1 | !SeedVR2 3B Test 1 · manual-1 | !SeedVR2 7B Test 1 · manual-1 |
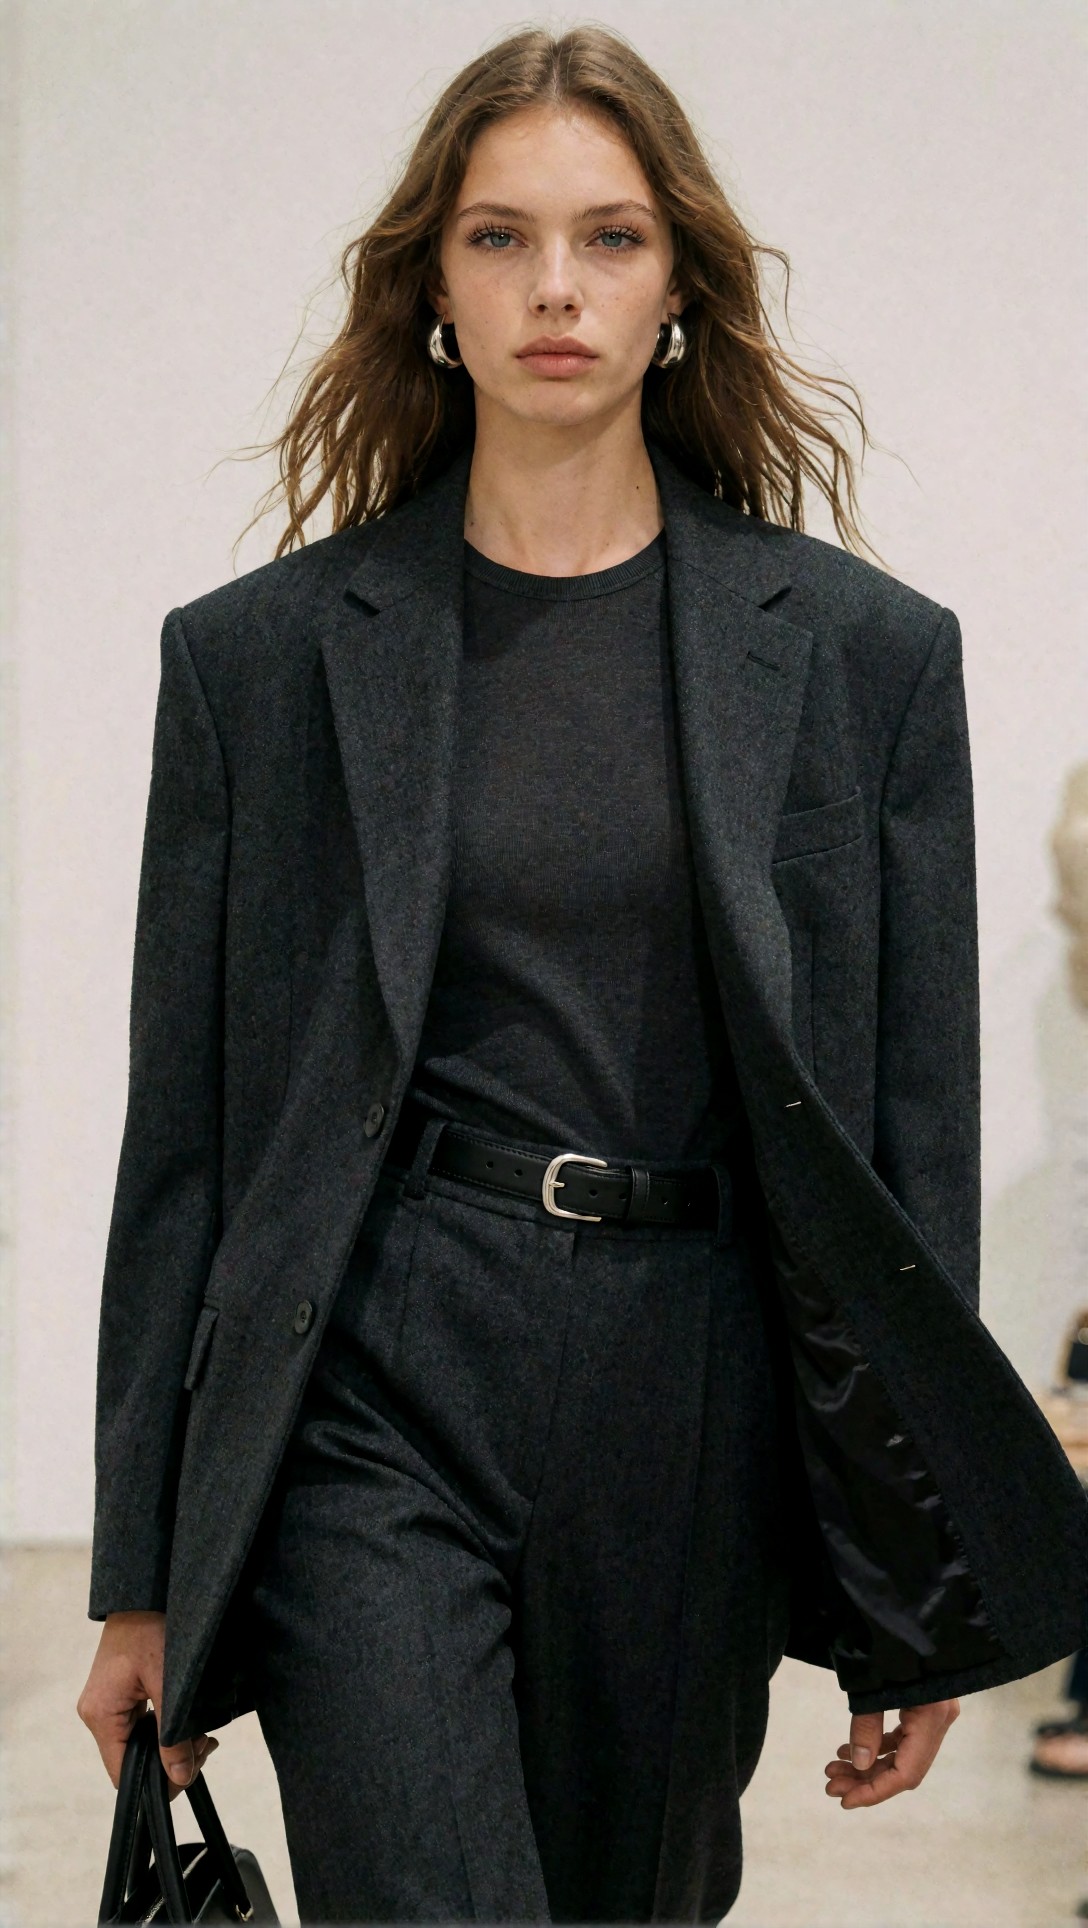
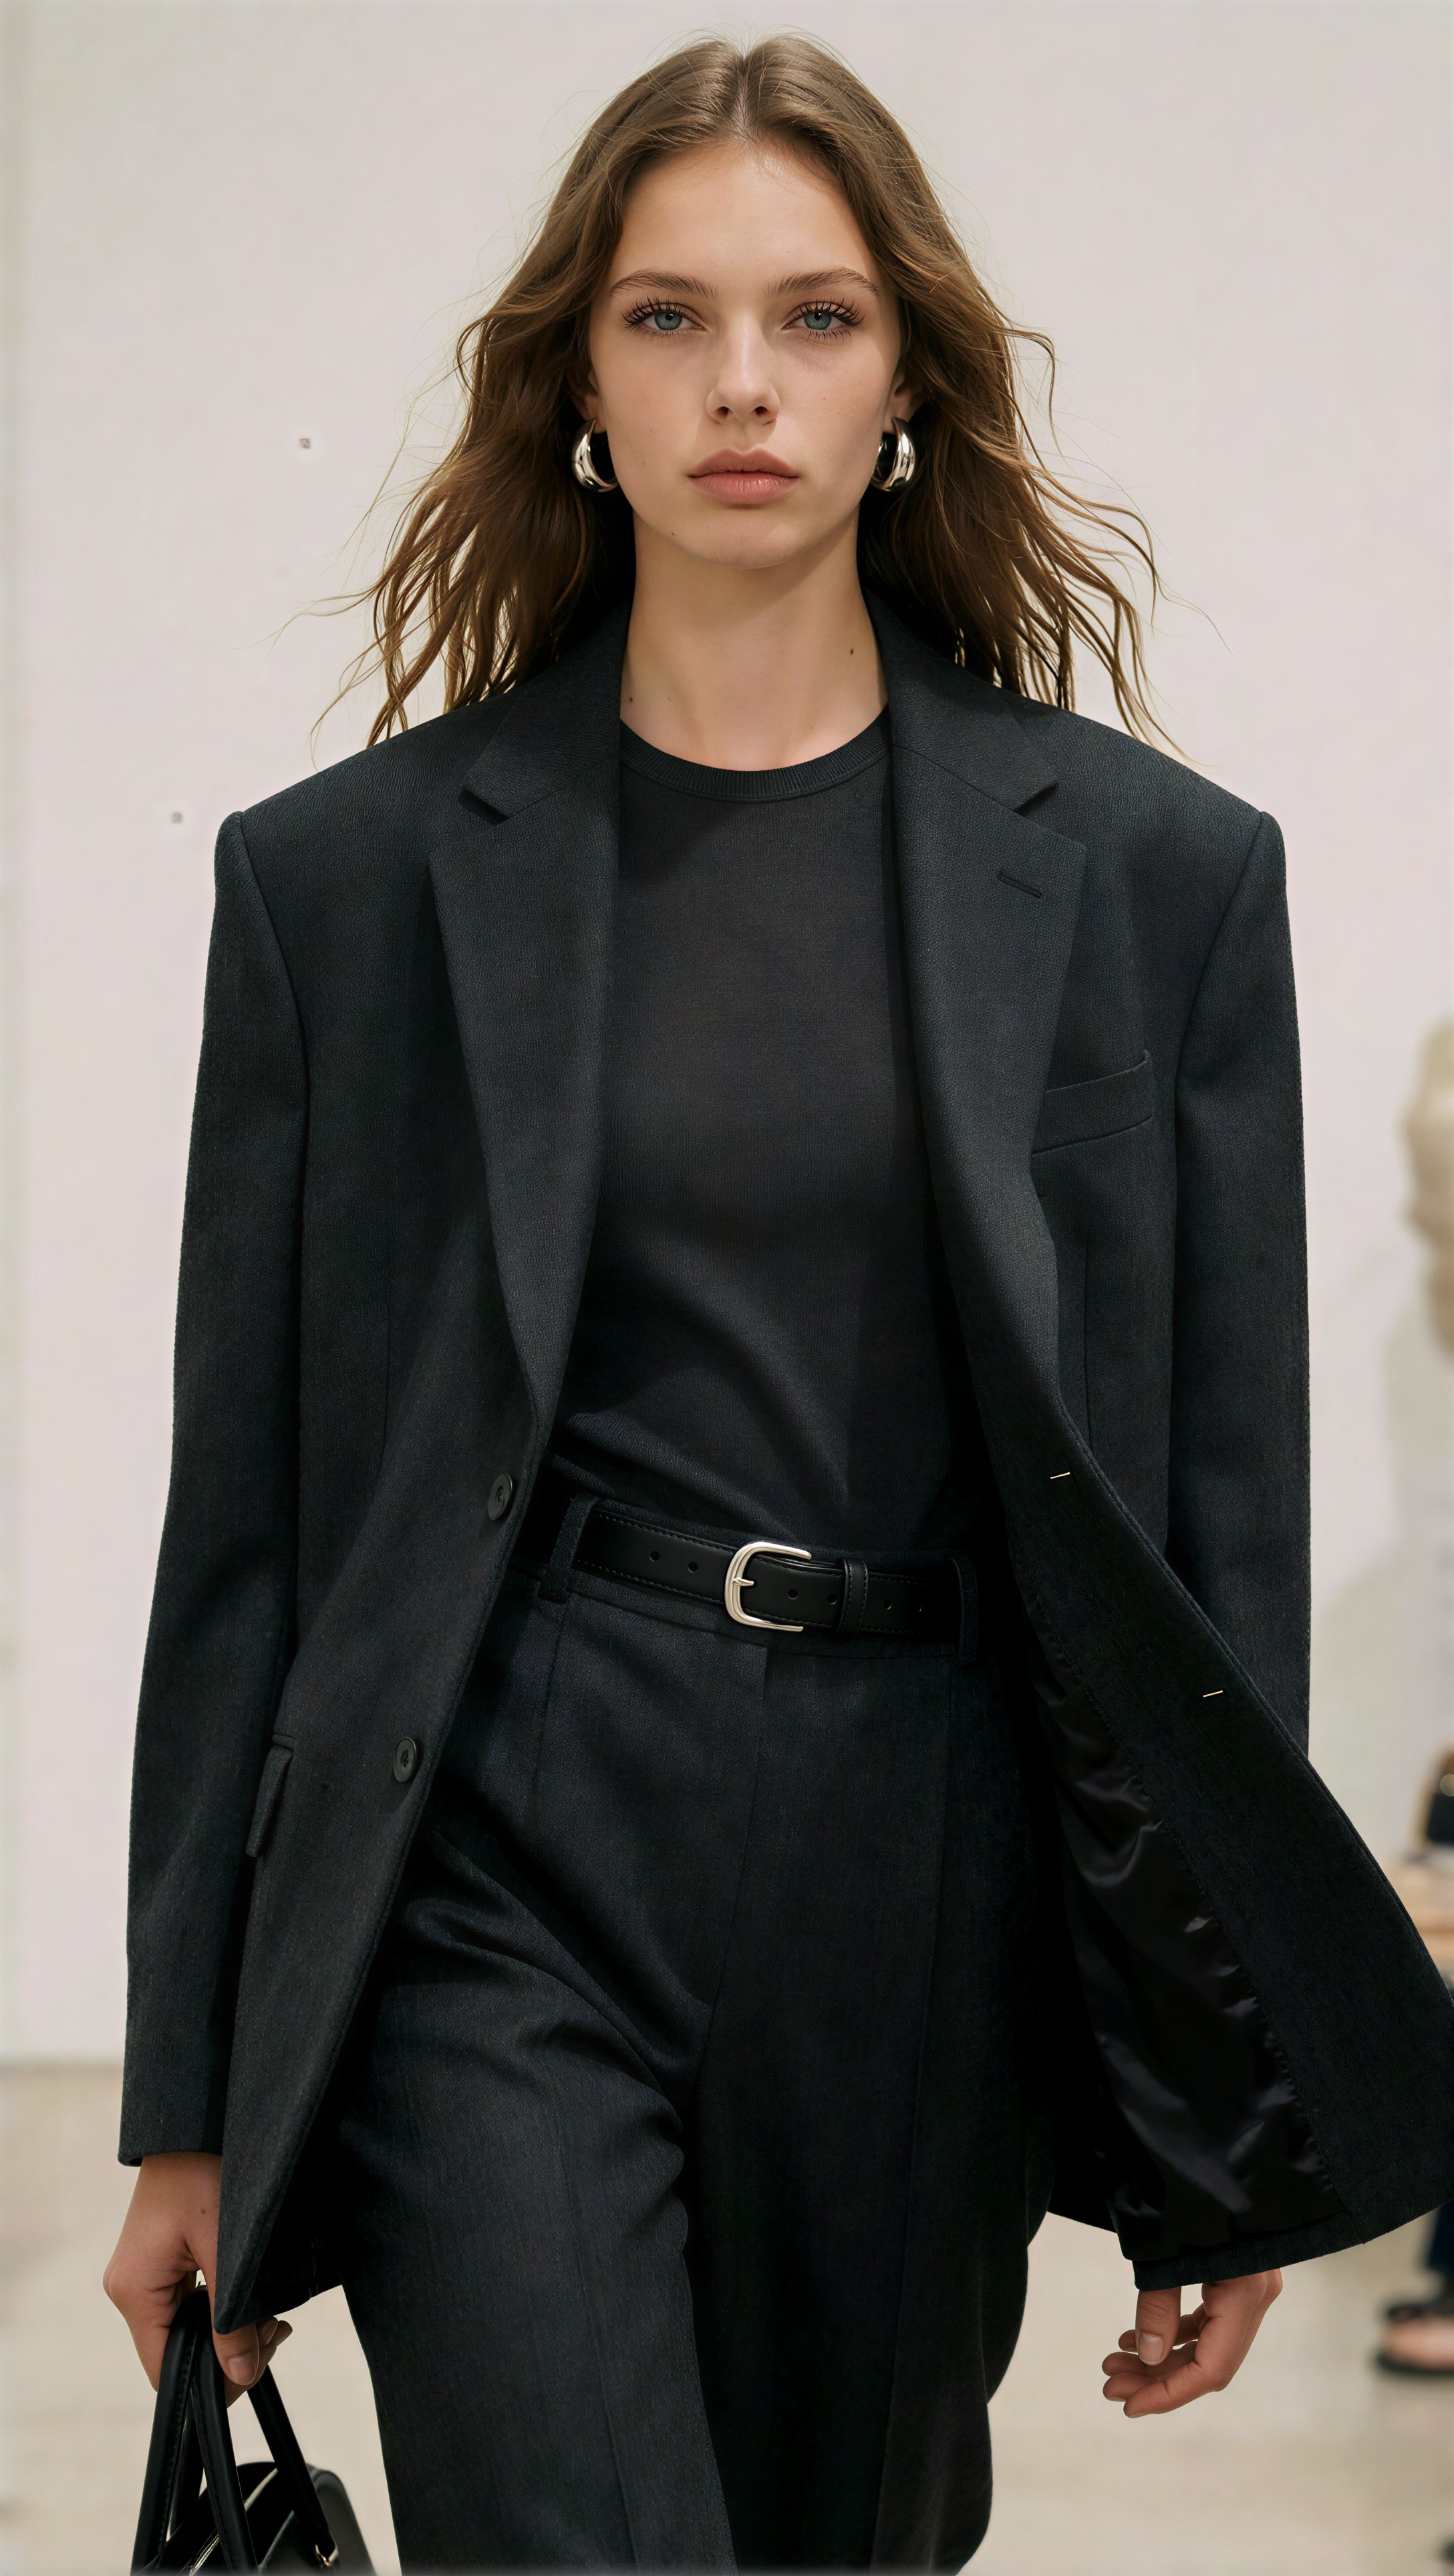
Inspect whether the upscaled result separates flyaway hair from the background without creating halos. Also zoom into the blazer lapel edge to see whether 3B overcrispens the stitching.
SeedVR2 7B: long-form technical review
SeedVR2 7B was the stronger result in this portrait test, not because it made the image look dramatically sharper from a distance, but because it reconstructed difficult transitions more convincingly. The value of 7B showed up in exactly the places portrait editors tend to check last and regret later: lash separation, hairline irregularity, skin texture balance, and edge continuity where a clean background leaves no room to hide.
Hair strands and edge reconstruction
Fine hair detail is usually where portrait upscalers expose their real behavior. With the same Krea2 Turbo source image, 7B kept more of the natural strand hierarchy. I could still see grouped sections of hair, but there was a more believable distinction between main locks, lighter flyaways, and the soft transition into the lit background.
3B often made the outer contour look sharp enough, but 7B was better at preserving internal variation. That mattered most near the temples and along the shoulder where overlapping strands crossed fabric texture. In those areas, 7B reduced the “compressed brush” look that can happen when a smaller model turns complex hair into a simplified edge map.
This second test pushed longer hair and visible outerwear texture together, which is where strand overlap becomes harder. It is a good stress test for edge reconstruction, especially around the shoulder line.
Topic: Street-style portrait with long hair over textured outerwear
Genre: Street Style
Camera: Canon EOS R5
Lens: 35mm f/1.8
Lighting: Overcast diffusion
Location: Seoul street with quiet storefront facades
Style: Trend-led urban editorial
Final Prompt: street-style full body portrait on a Seoul sidewalk, model wearing an oversized wool coat over a cropped knit, pleated wide-leg trousers, leather loafers, crossbody bag, layered silver jewelry, long dark hair falling across the coat shoulders with loose strands lifted slightly by wind, soft overcast light, muted shopfront background, contemporary trend-led styling, full outfit logic visible, editorial street framing, realistic textile texture in wool, knit ribbing, trouser pleats, and bag leather grain, balanced natural face detail and clean edge separation
Comparison image 2
The same Krea2 source image is used for both outputs: SeedVR2 3B on the left and SeedVR2 7B on the right.
| Krea2 source | SeedVR2 3B output | SeedVR2 7B output | | --- | --- | --- | | !Krea2 source Test 2 · manual-2 | !SeedVR2 3B Test 2 · manual-2 | !SeedVR2 7B Test 2 · manual-2 |
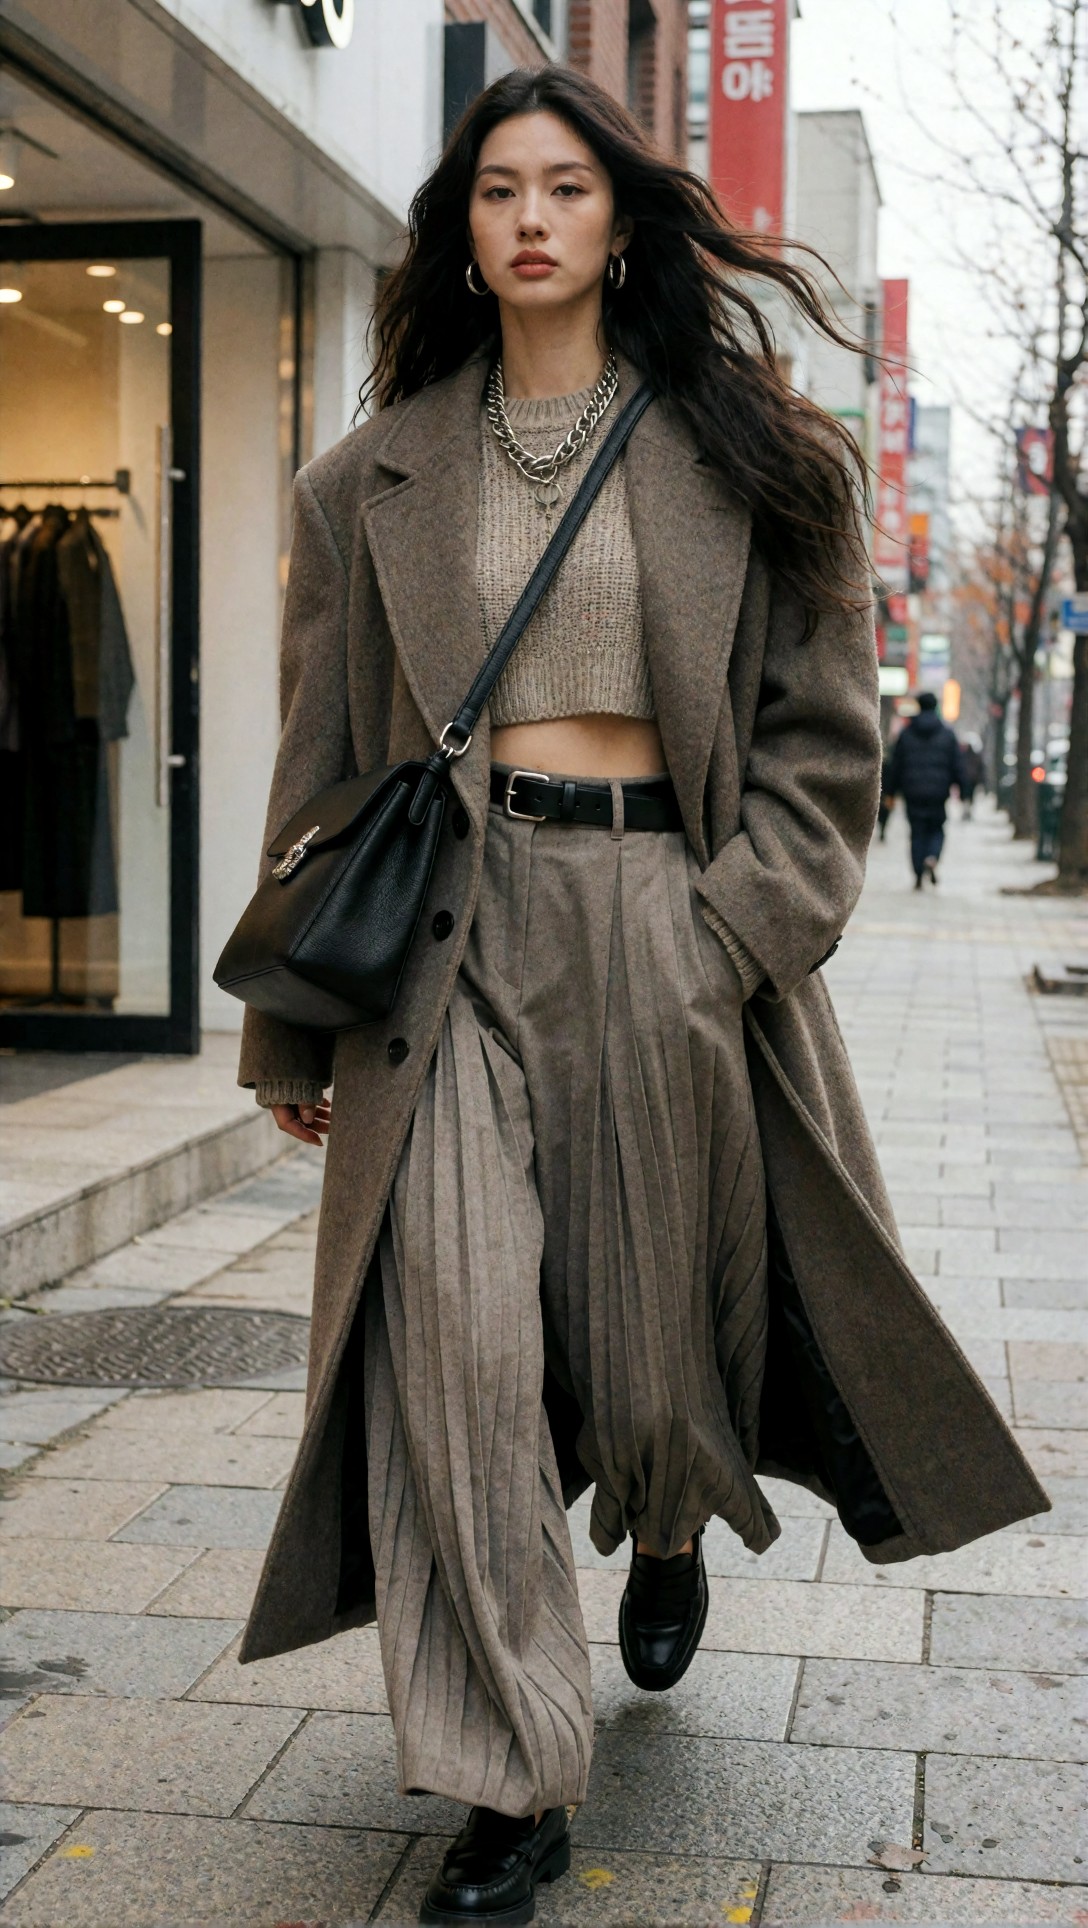
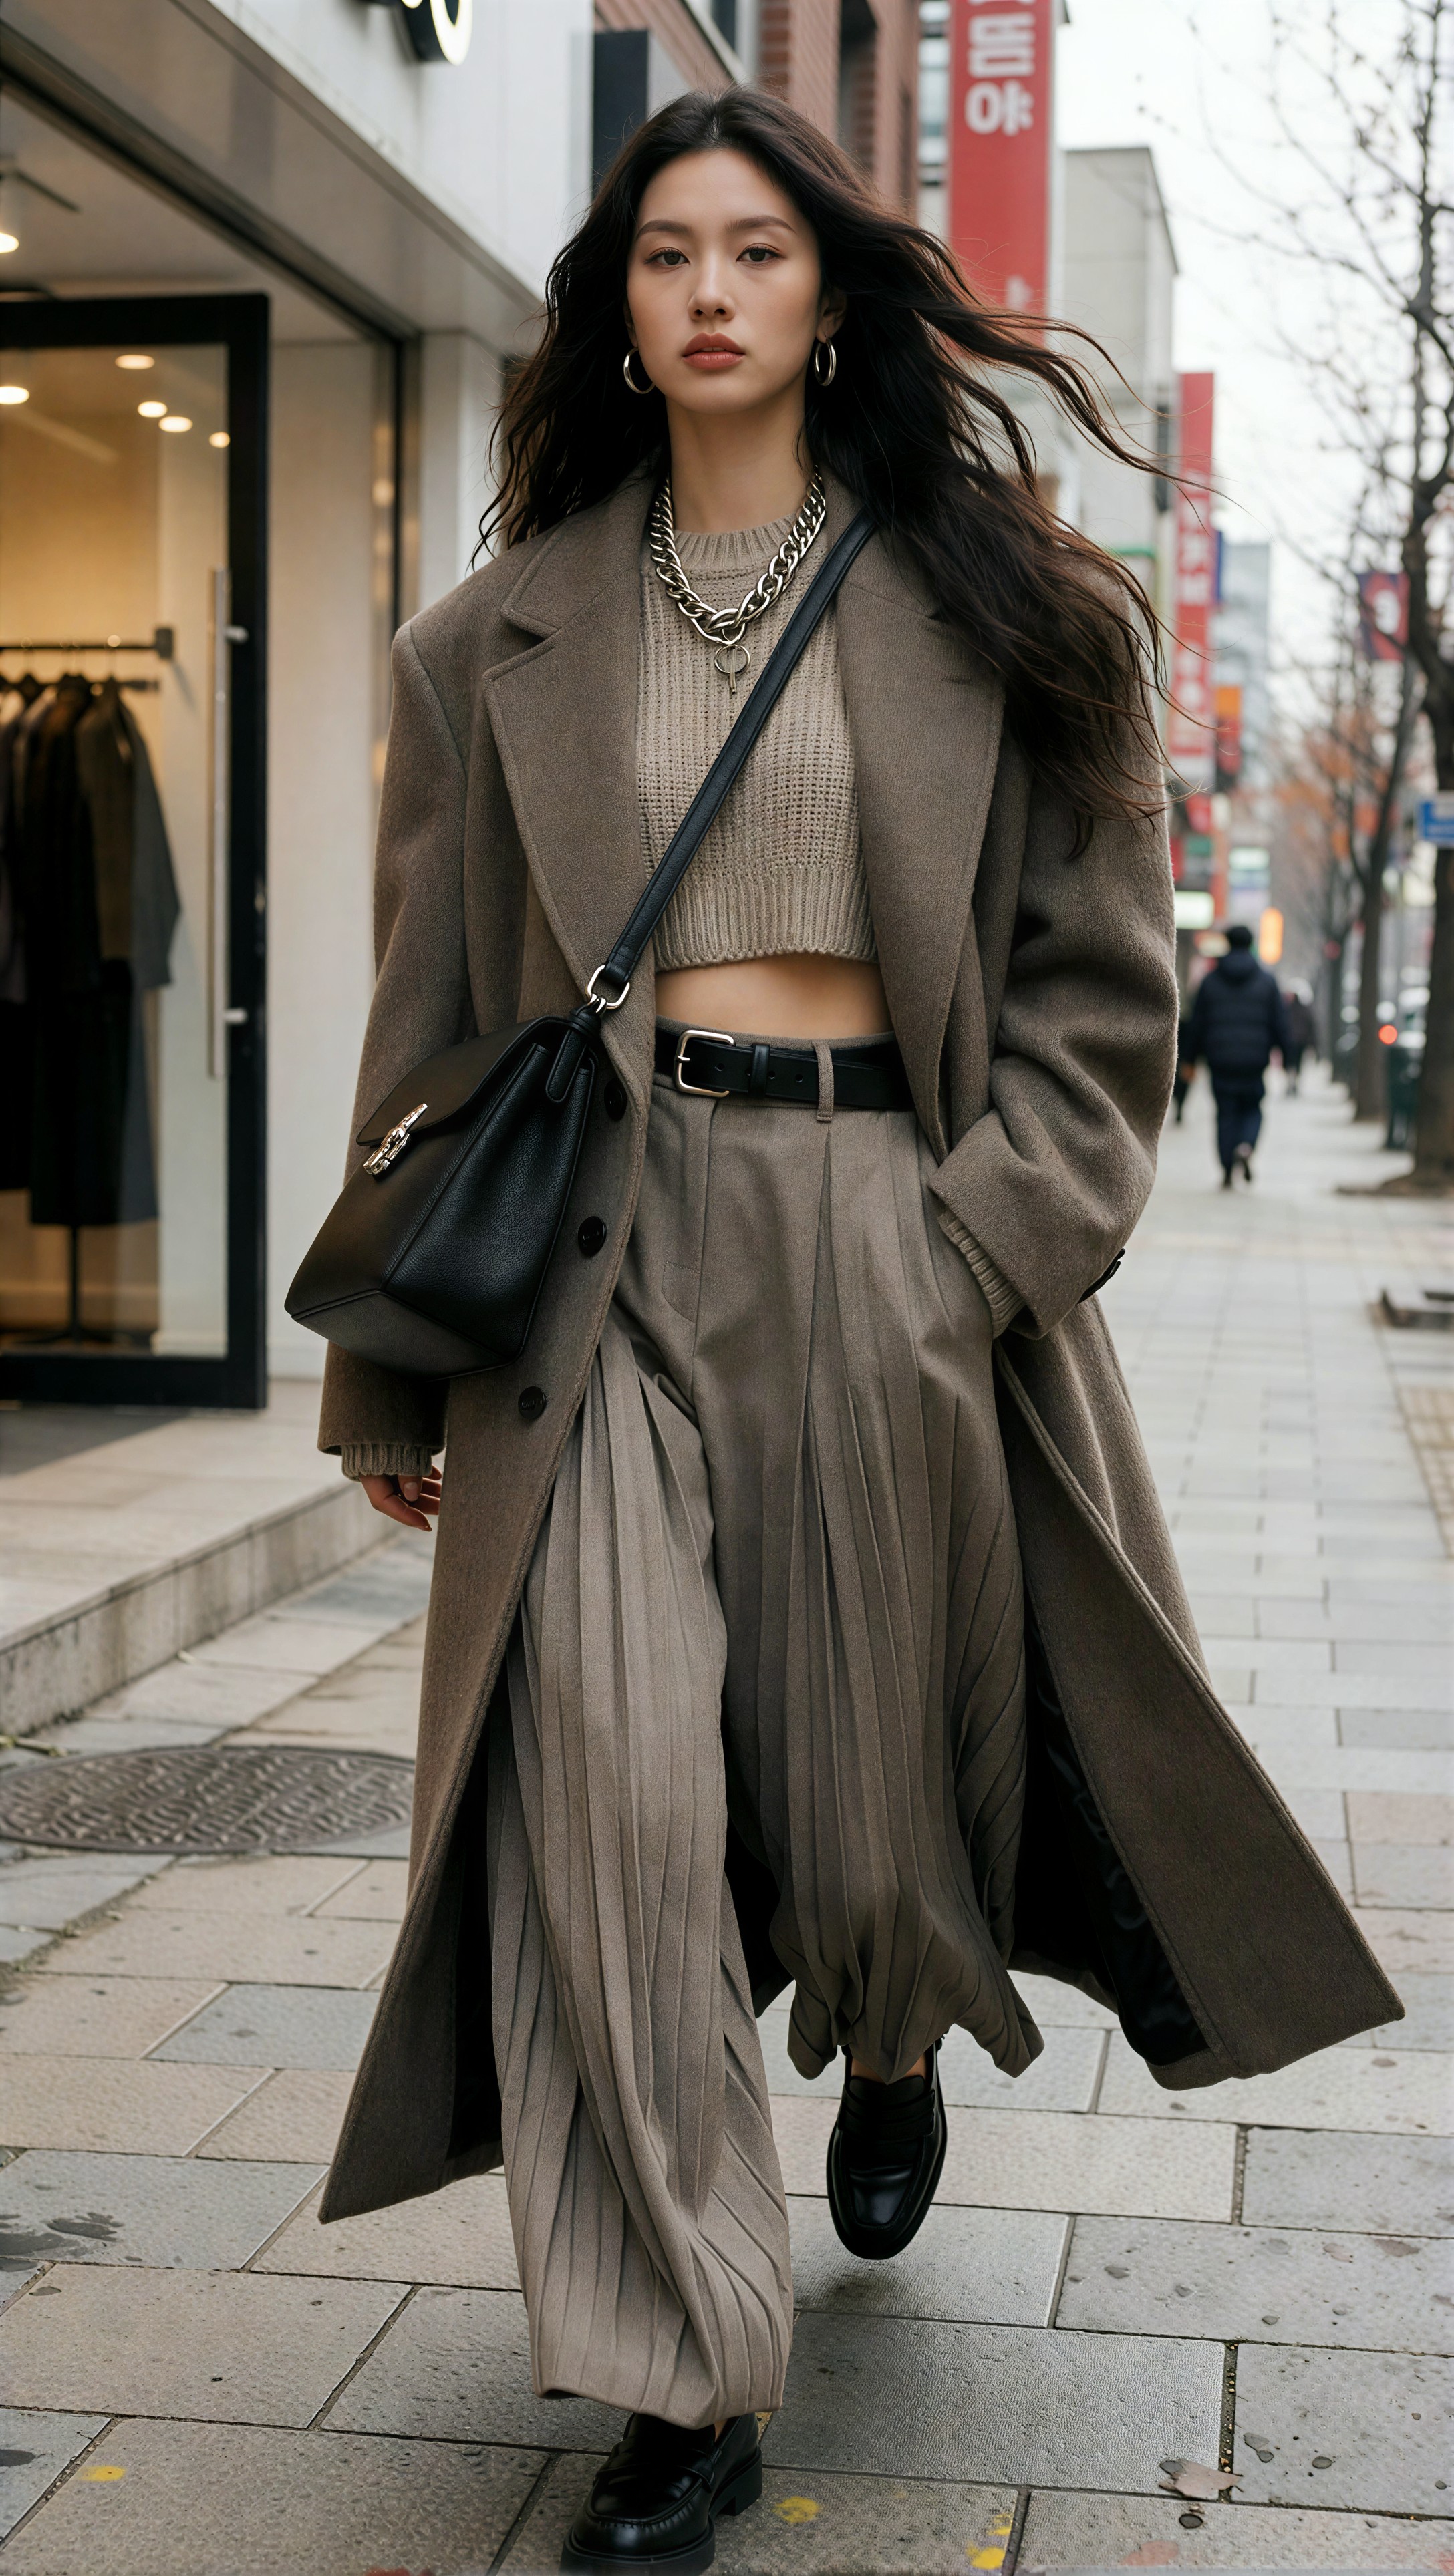
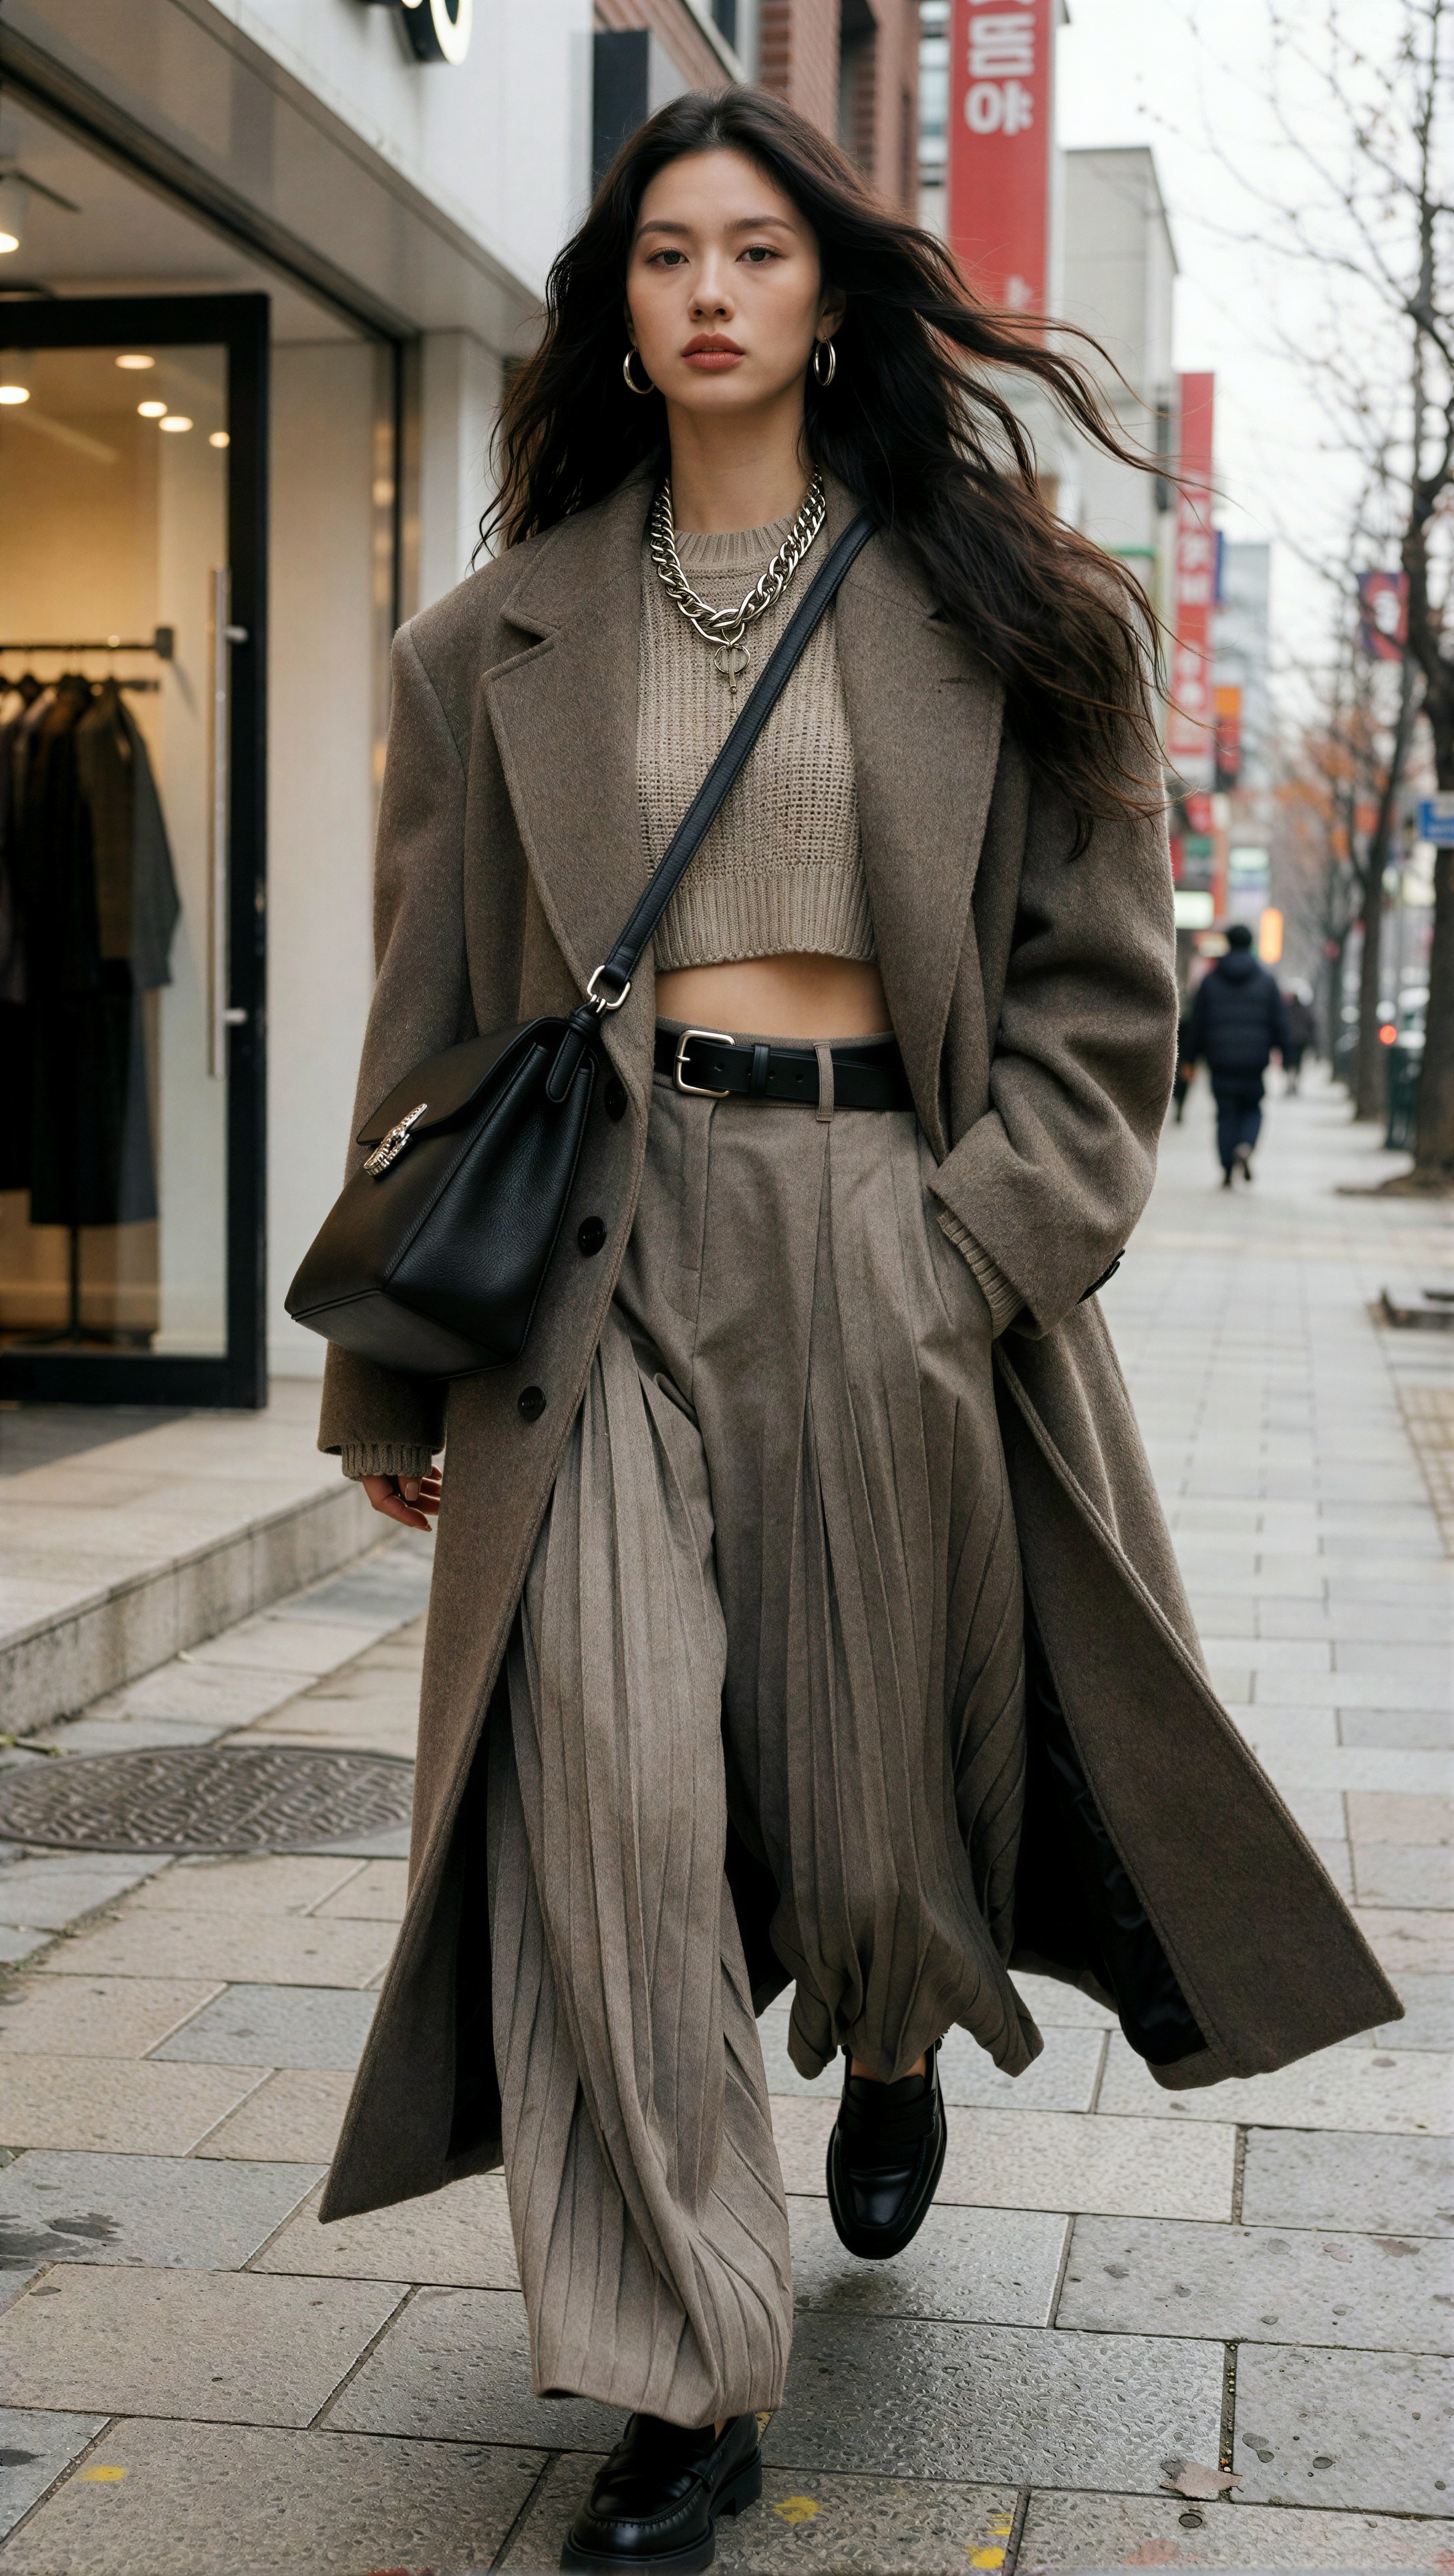
When you inspect the result, compare the strands that cross the coat shoulder. The stronger upscale keeps those thin overlaps readable without turning them into heavy outlines.
Eyelashes, eye contour, and identity retention
The eye area was where 7B most clearly earned its heavier run profile. Lashes remained separated more naturally, and the upper lid contour stayed cleaner without thickening too much. This is a subtle point, but it affects identity retention. Once lashes become too dark, too parallel, or too graphic, the face can shift toward a cosmetically altered version of the original.
In this test, 7B maintained a better balance between clarity and softness. The iris edge and lower lash line looked less forced. 3B was not bad, but it had a greater tendency to convert ambiguity into contrast.
That is often welcome in product edges or architecture. In portraits, it can make the face look processed.
This third prompt was chosen to expose eyelash handling under cleaner beauty lighting while still keeping styling visible. I wanted a fashion-led image that still allowed eye-area crop review.
Topic: Beauty-led fashion portrait with visible eyewear styling and clean lash detail
Genre: Beauty Campaign
Camera: Nikon Z8
Lens: 85mm f/1.8
Lighting: Studio butterfly light with soft lower fill
Location: Minimal cream editorial set
Style: High-end beauty advertising
Final Prompt: accessories close-up fashion portrait featuring a model in a sleek satin blouse, slim gold hoop earrings, translucent statement eyewear held slightly away from the face, smooth pulled-back hair, refined beauty-campaign styling, studio butterfly light with soft fill, minimal cream set, direct gaze, natural eyelashes and crisp eye contour, subtle skin texture, glossy but controlled color rendering, premium editorial composition, visible styling details in blouse sheen and jewelry finish
Comparison image 3
The same Krea2 source image is used for both outputs: SeedVR2 3B on the left and SeedVR2 7B on the right.
| Krea2 source | SeedVR2 3B output | SeedVR2 7B output | | --- | --- | --- | | !Krea2 source Test 3 · manual-3 | !SeedVR2 3B Test 3 · manual-3 | !SeedVR2 7B Test 3 · manual-3 |
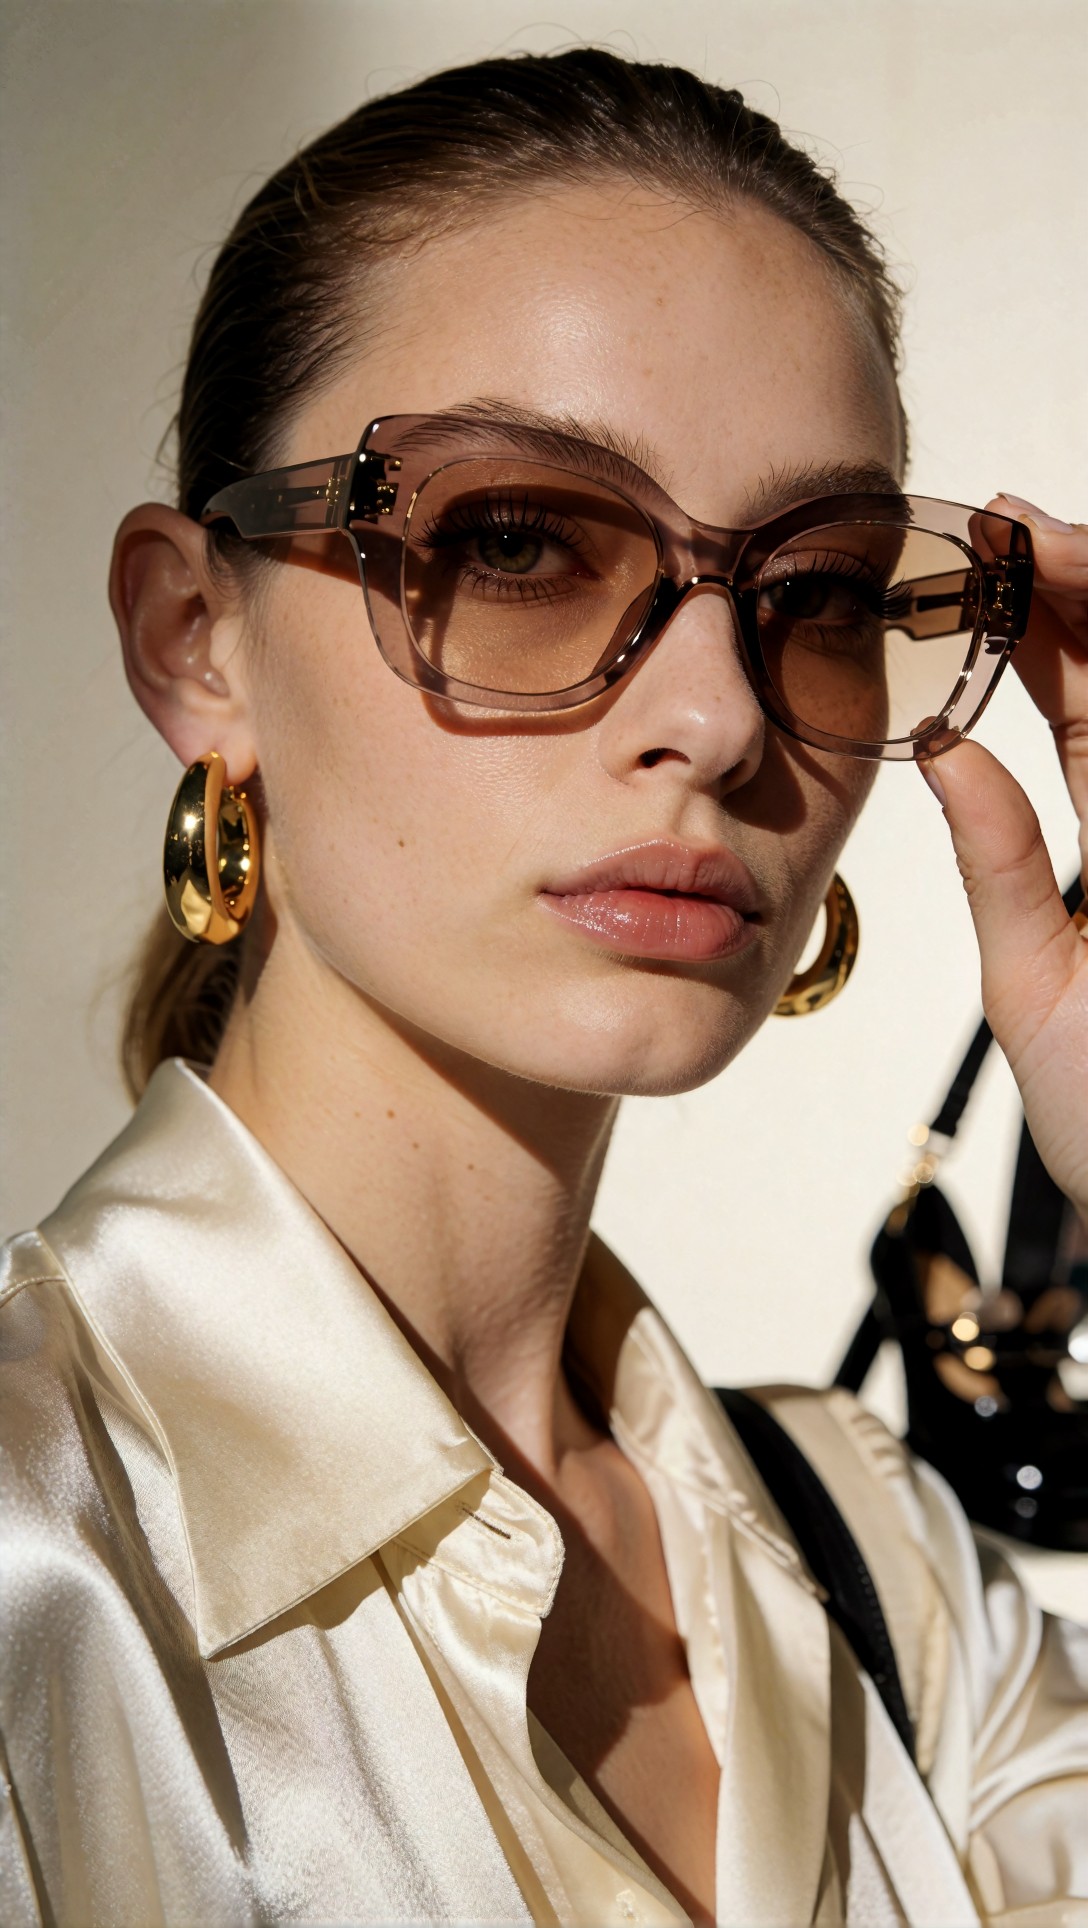
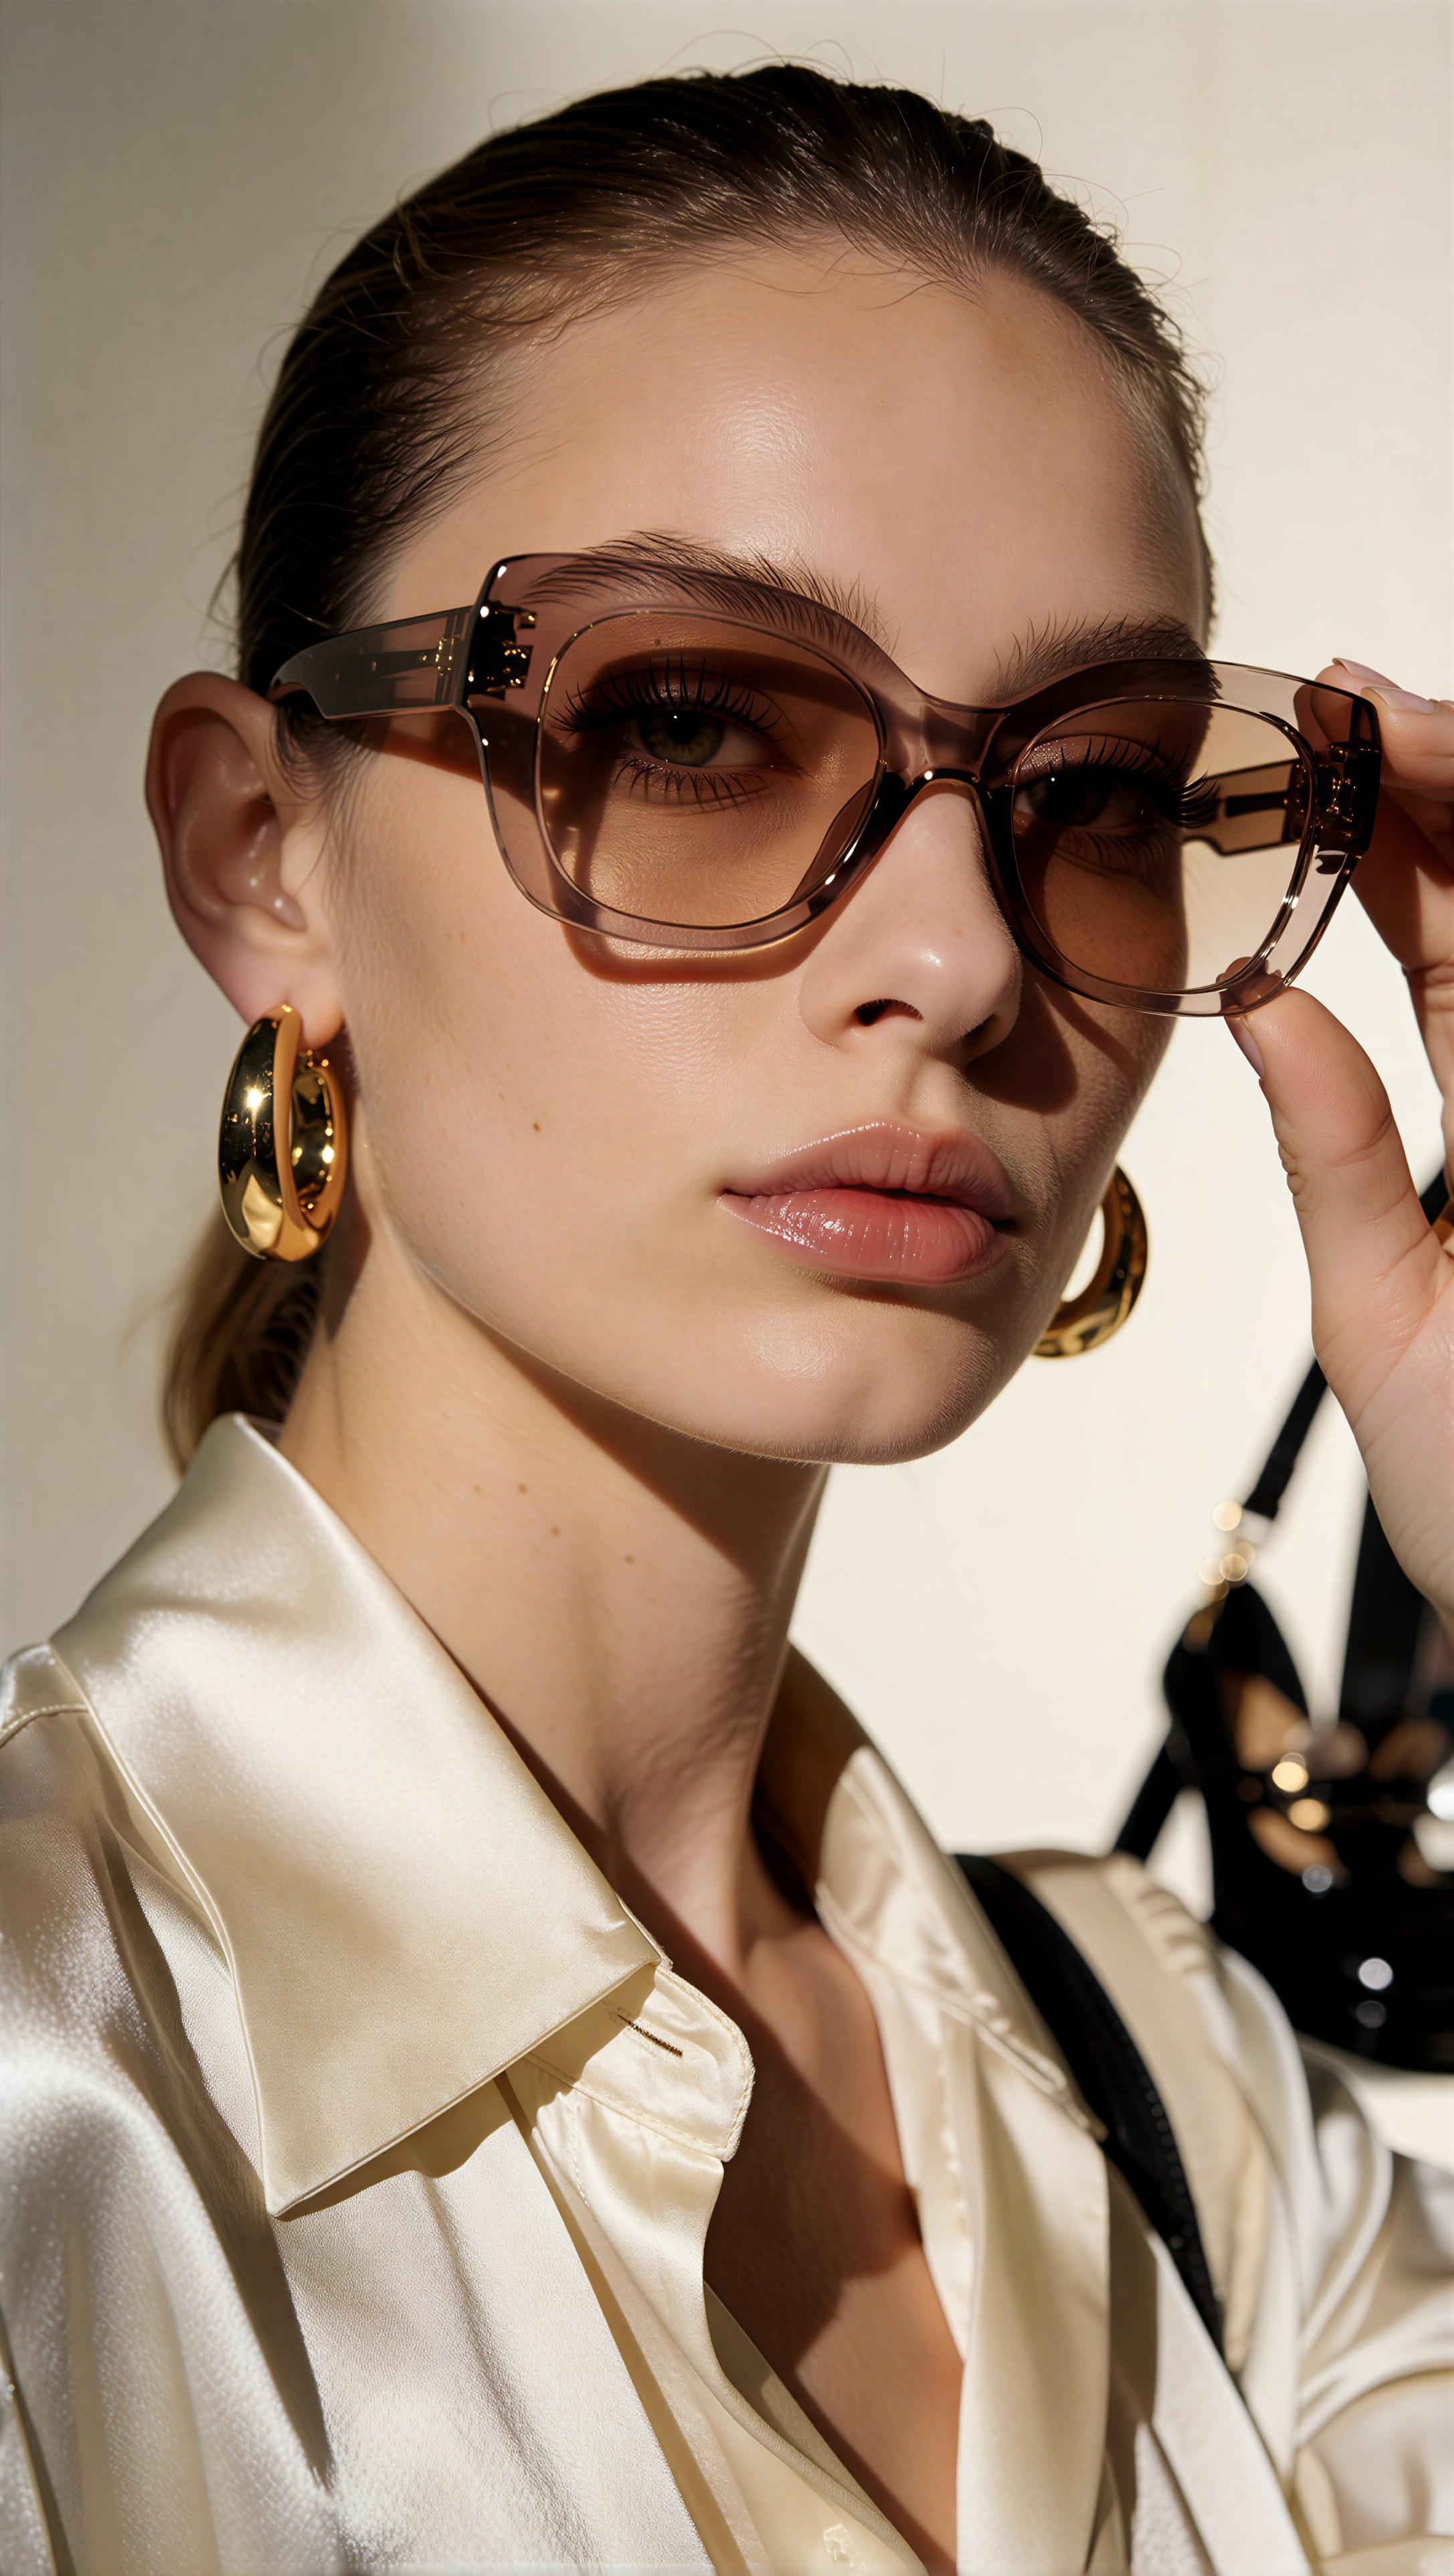
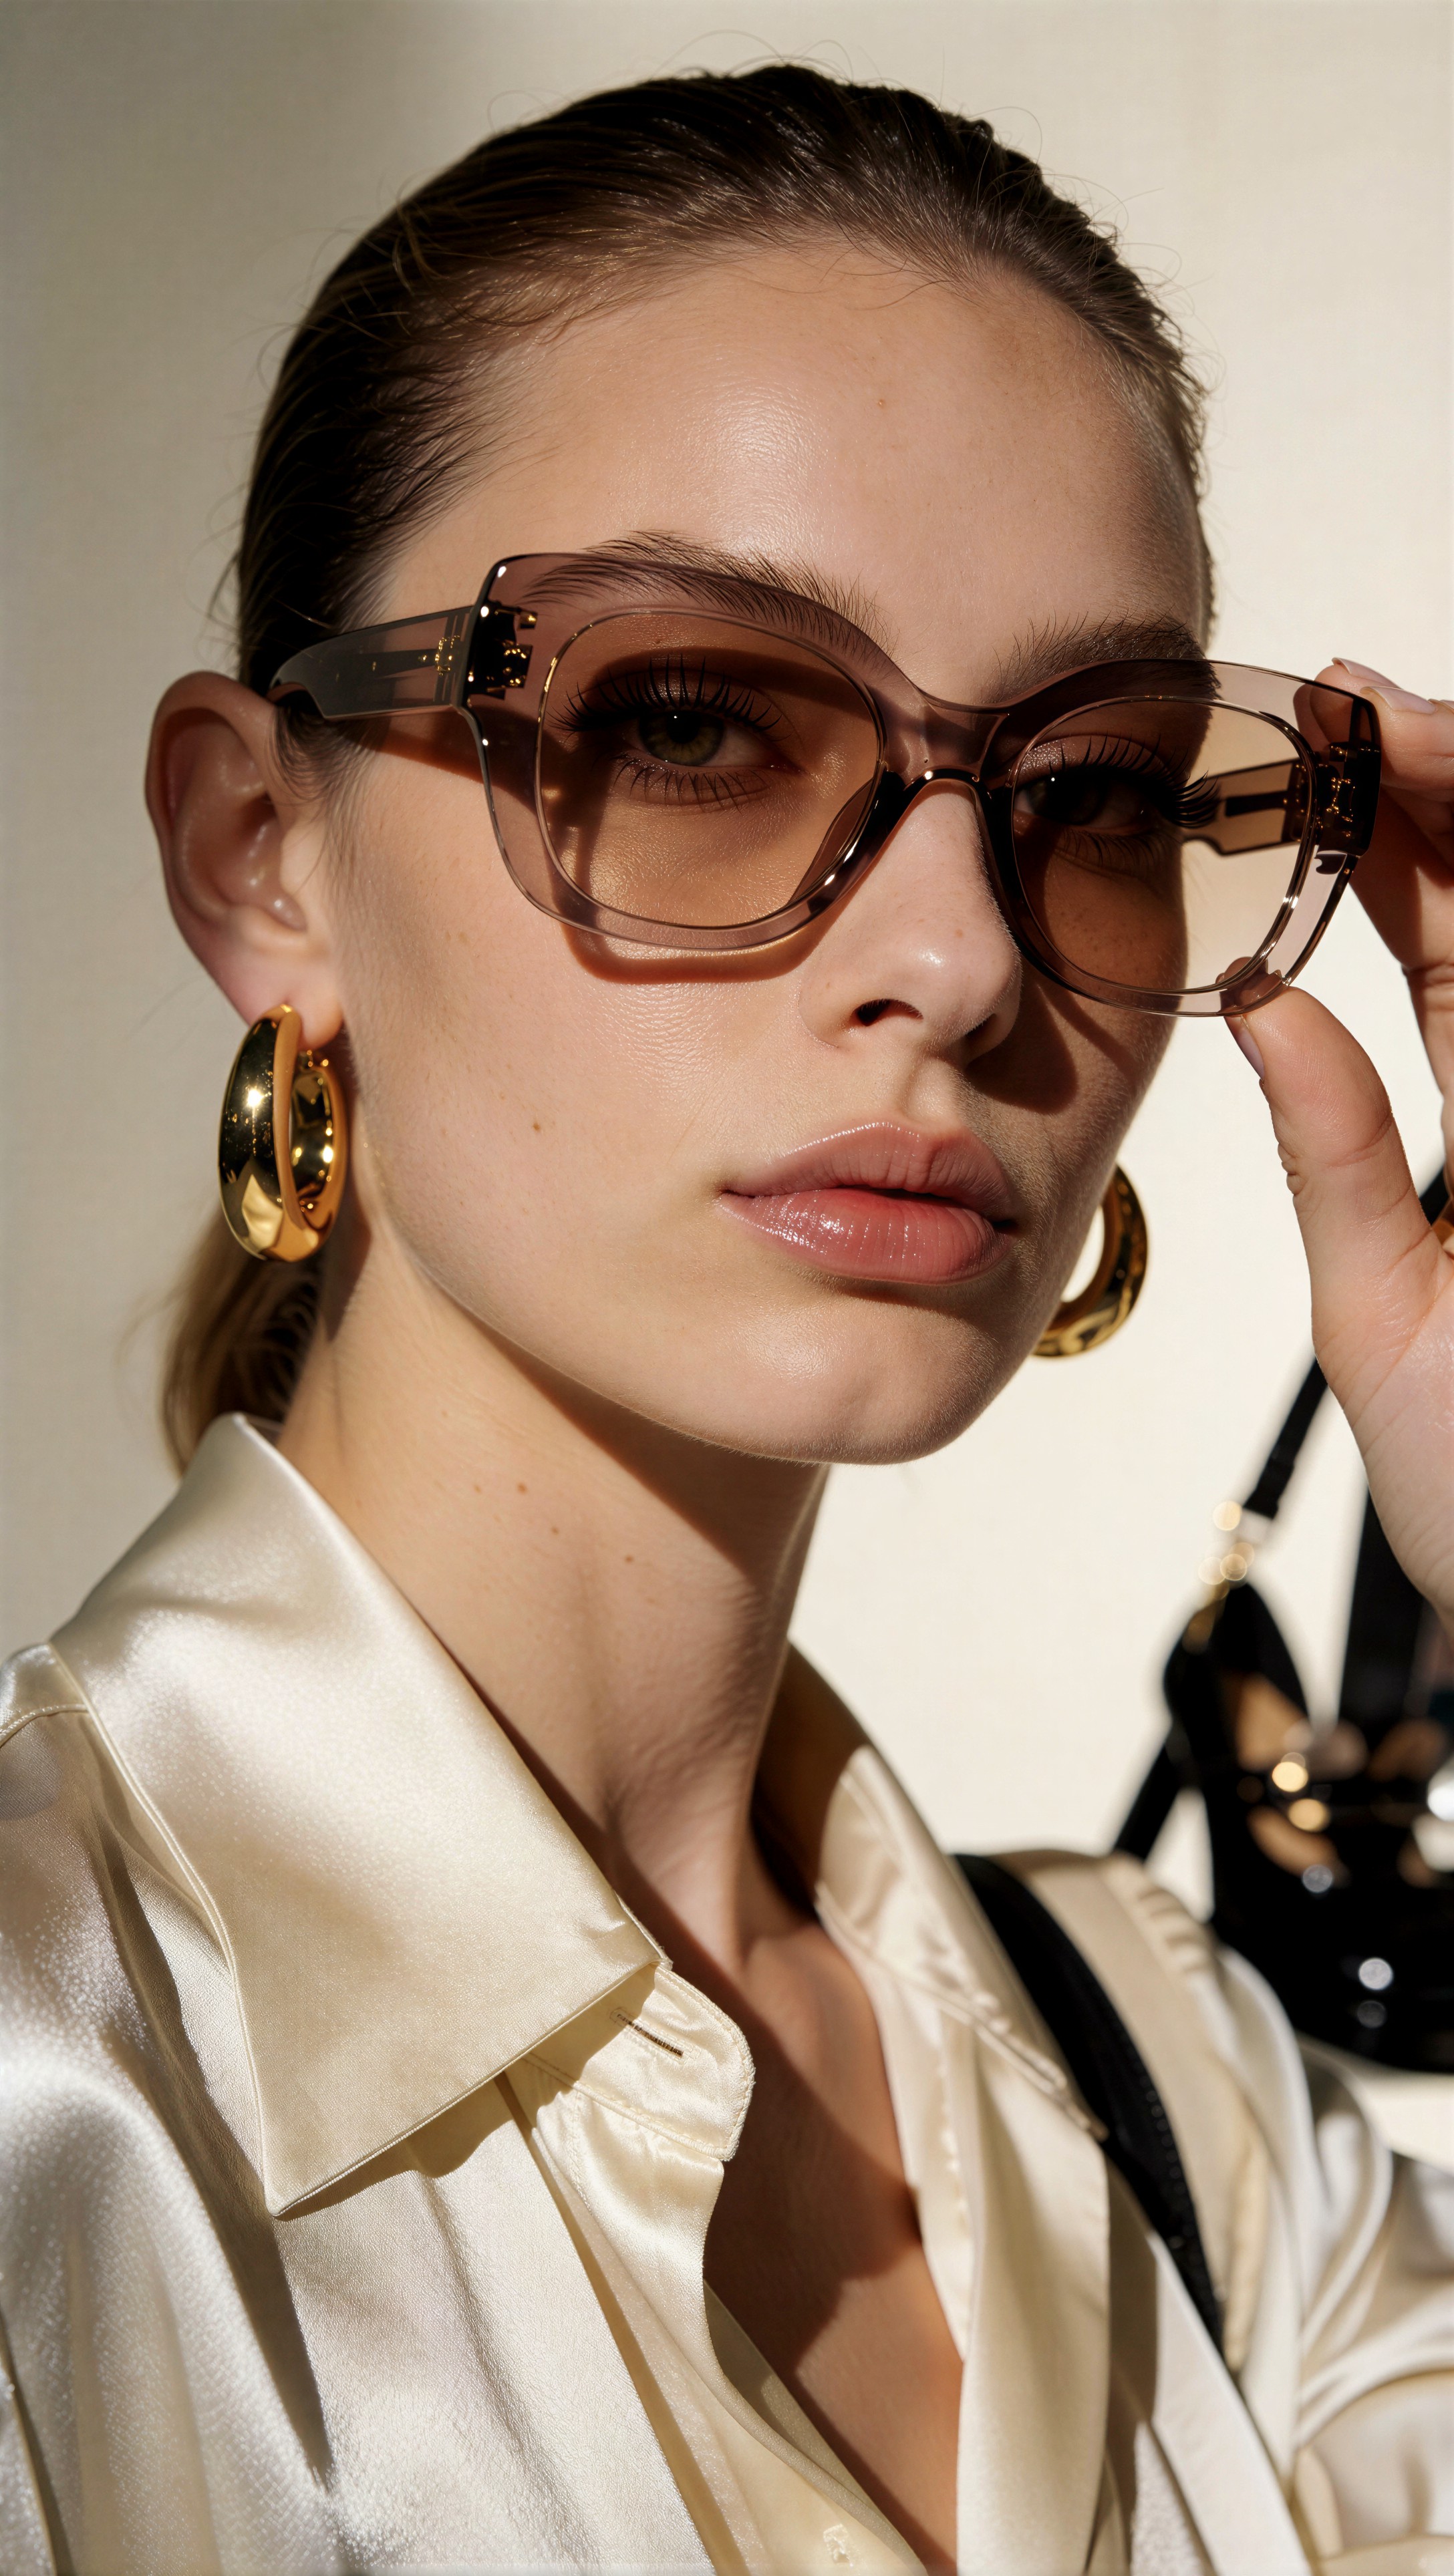
Check the upper lash line and the tiny transition between eyelid, liner-free lashes, and iris edge. The better output should look resolved, not drawn over.
Skin pores and texture realism
Skin is where upscalers often become less honest. Many can make a face look detailed by printing pore-like grain onto smooth areas. That is not the same as retaining skin texture.
In the cheek and forehead crops from this test, 7B produced the more natural texture map. Pores were present but not evenly distributed. The highlight roll-off looked smoother, and the skin did not acquire the same etched micro-contrast that 3B occasionally introduced. This made the portrait feel more photographic and less mechanically sharpened.
The practical takeaway is important: if the image will be used in a gallery where users zoom, 7B gives you more room before the face starts to look overworked.
This fourth test focused on soft lighting and bare visible fabric texture, so that false pore creation would stand out quickly against cleaner skin zones.
Topic: Soft editorial portrait with knitwear and natural skin transitions
Genre: Lifestyle Portrait
Camera: Fujifilm GFX100 II
Lens: 80mm f/1.7
Lighting: Window light with white bounce fill
Location: Scandinavian-style studio loft
Style: Clean commercial look
Final Prompt: three-quarter outfit editorial portrait in a calm studio loft, model wearing a cream fine-gauge knit set with layered wool scarf, relaxed tailored trousers, soft leather flats, minimal rings, understated contemporary styling, seated near a large window with diffuse daylight and white bounce fill, natural expression, visible cheek texture, realistic forehead highlights, gentle skin transitions, knit fibers and scarf weave readable, pale interior background kept uncluttered, premium commercial editorial finish
Comparison image 4
The same Krea2 source image is used for both outputs: SeedVR2 3B on the left and SeedVR2 7B on the right.
| Krea2 source | SeedVR2 3B output | SeedVR2 7B output | | --- | --- | --- | | !Krea2 source Test 4 · manual-4 | !SeedVR2 3B Test 4 · manual-4 | !SeedVR2 7B Test 4 · manual-4 |
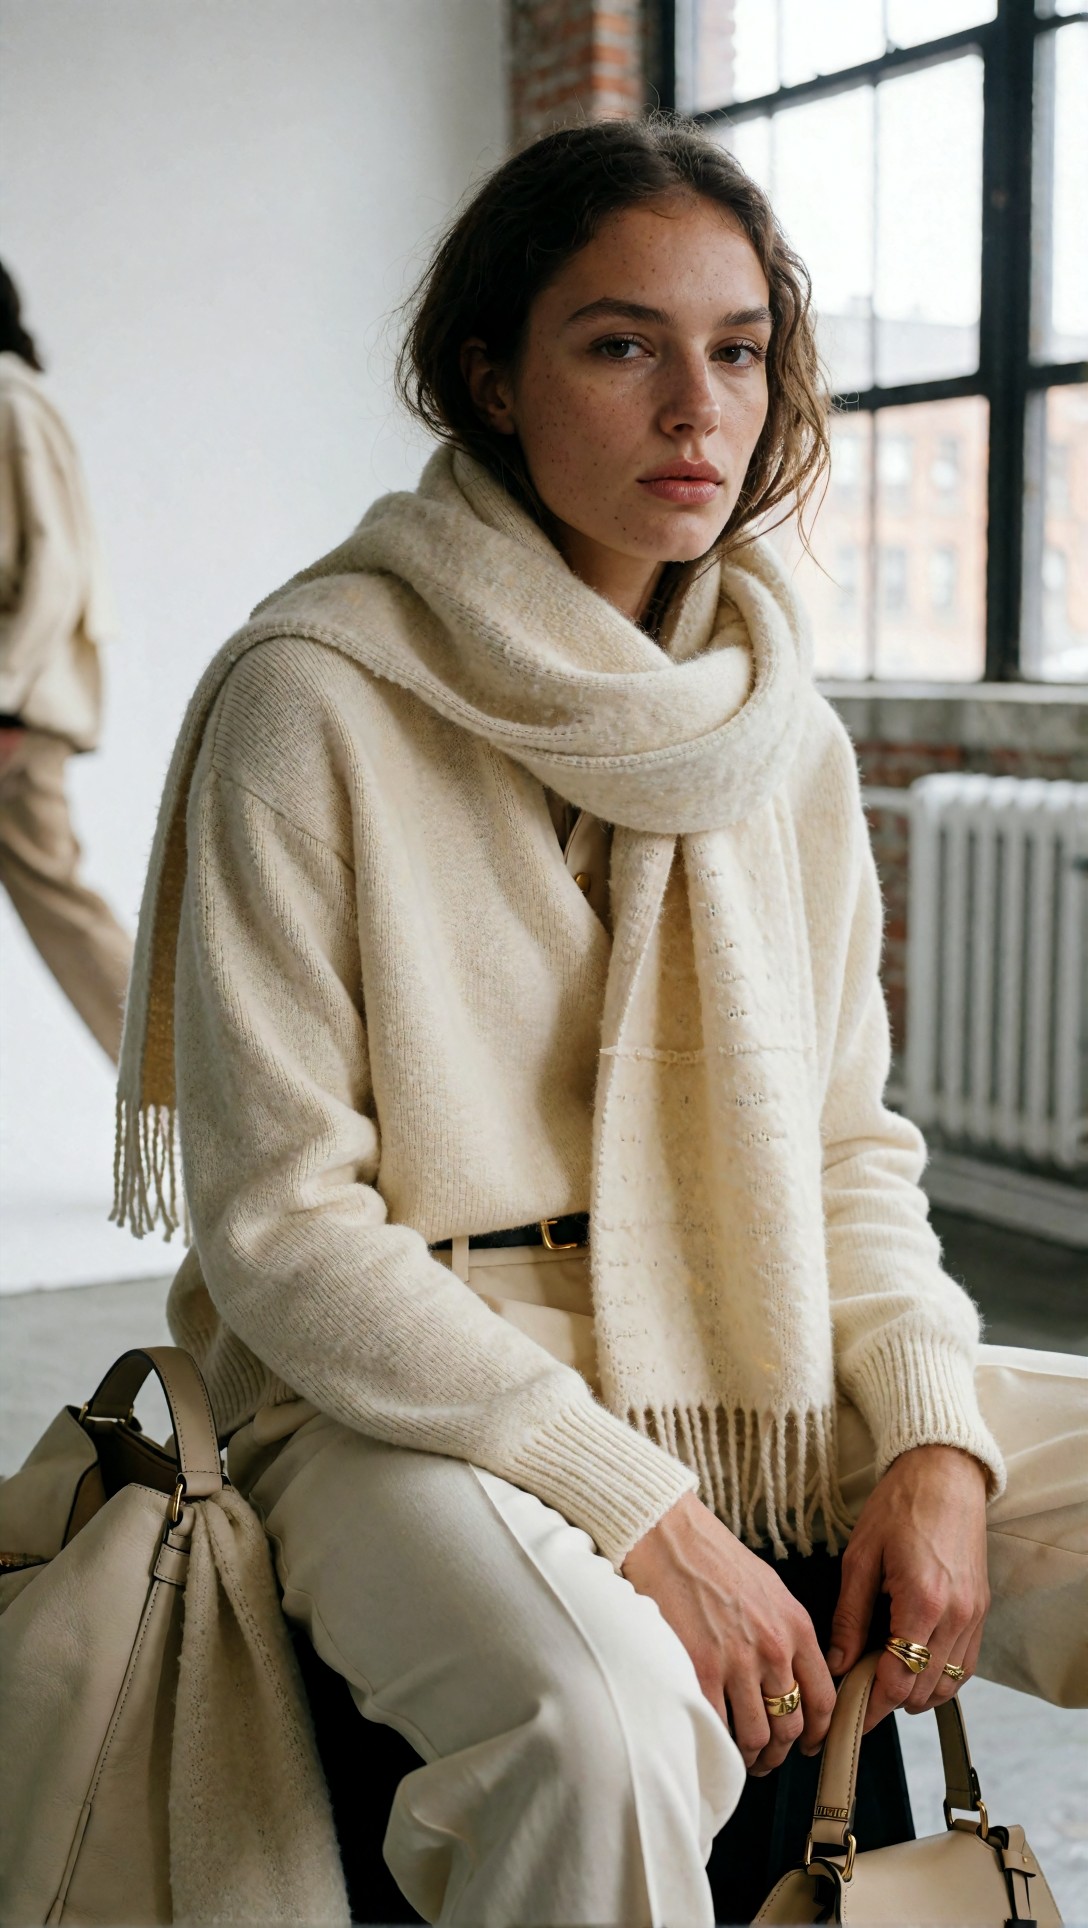
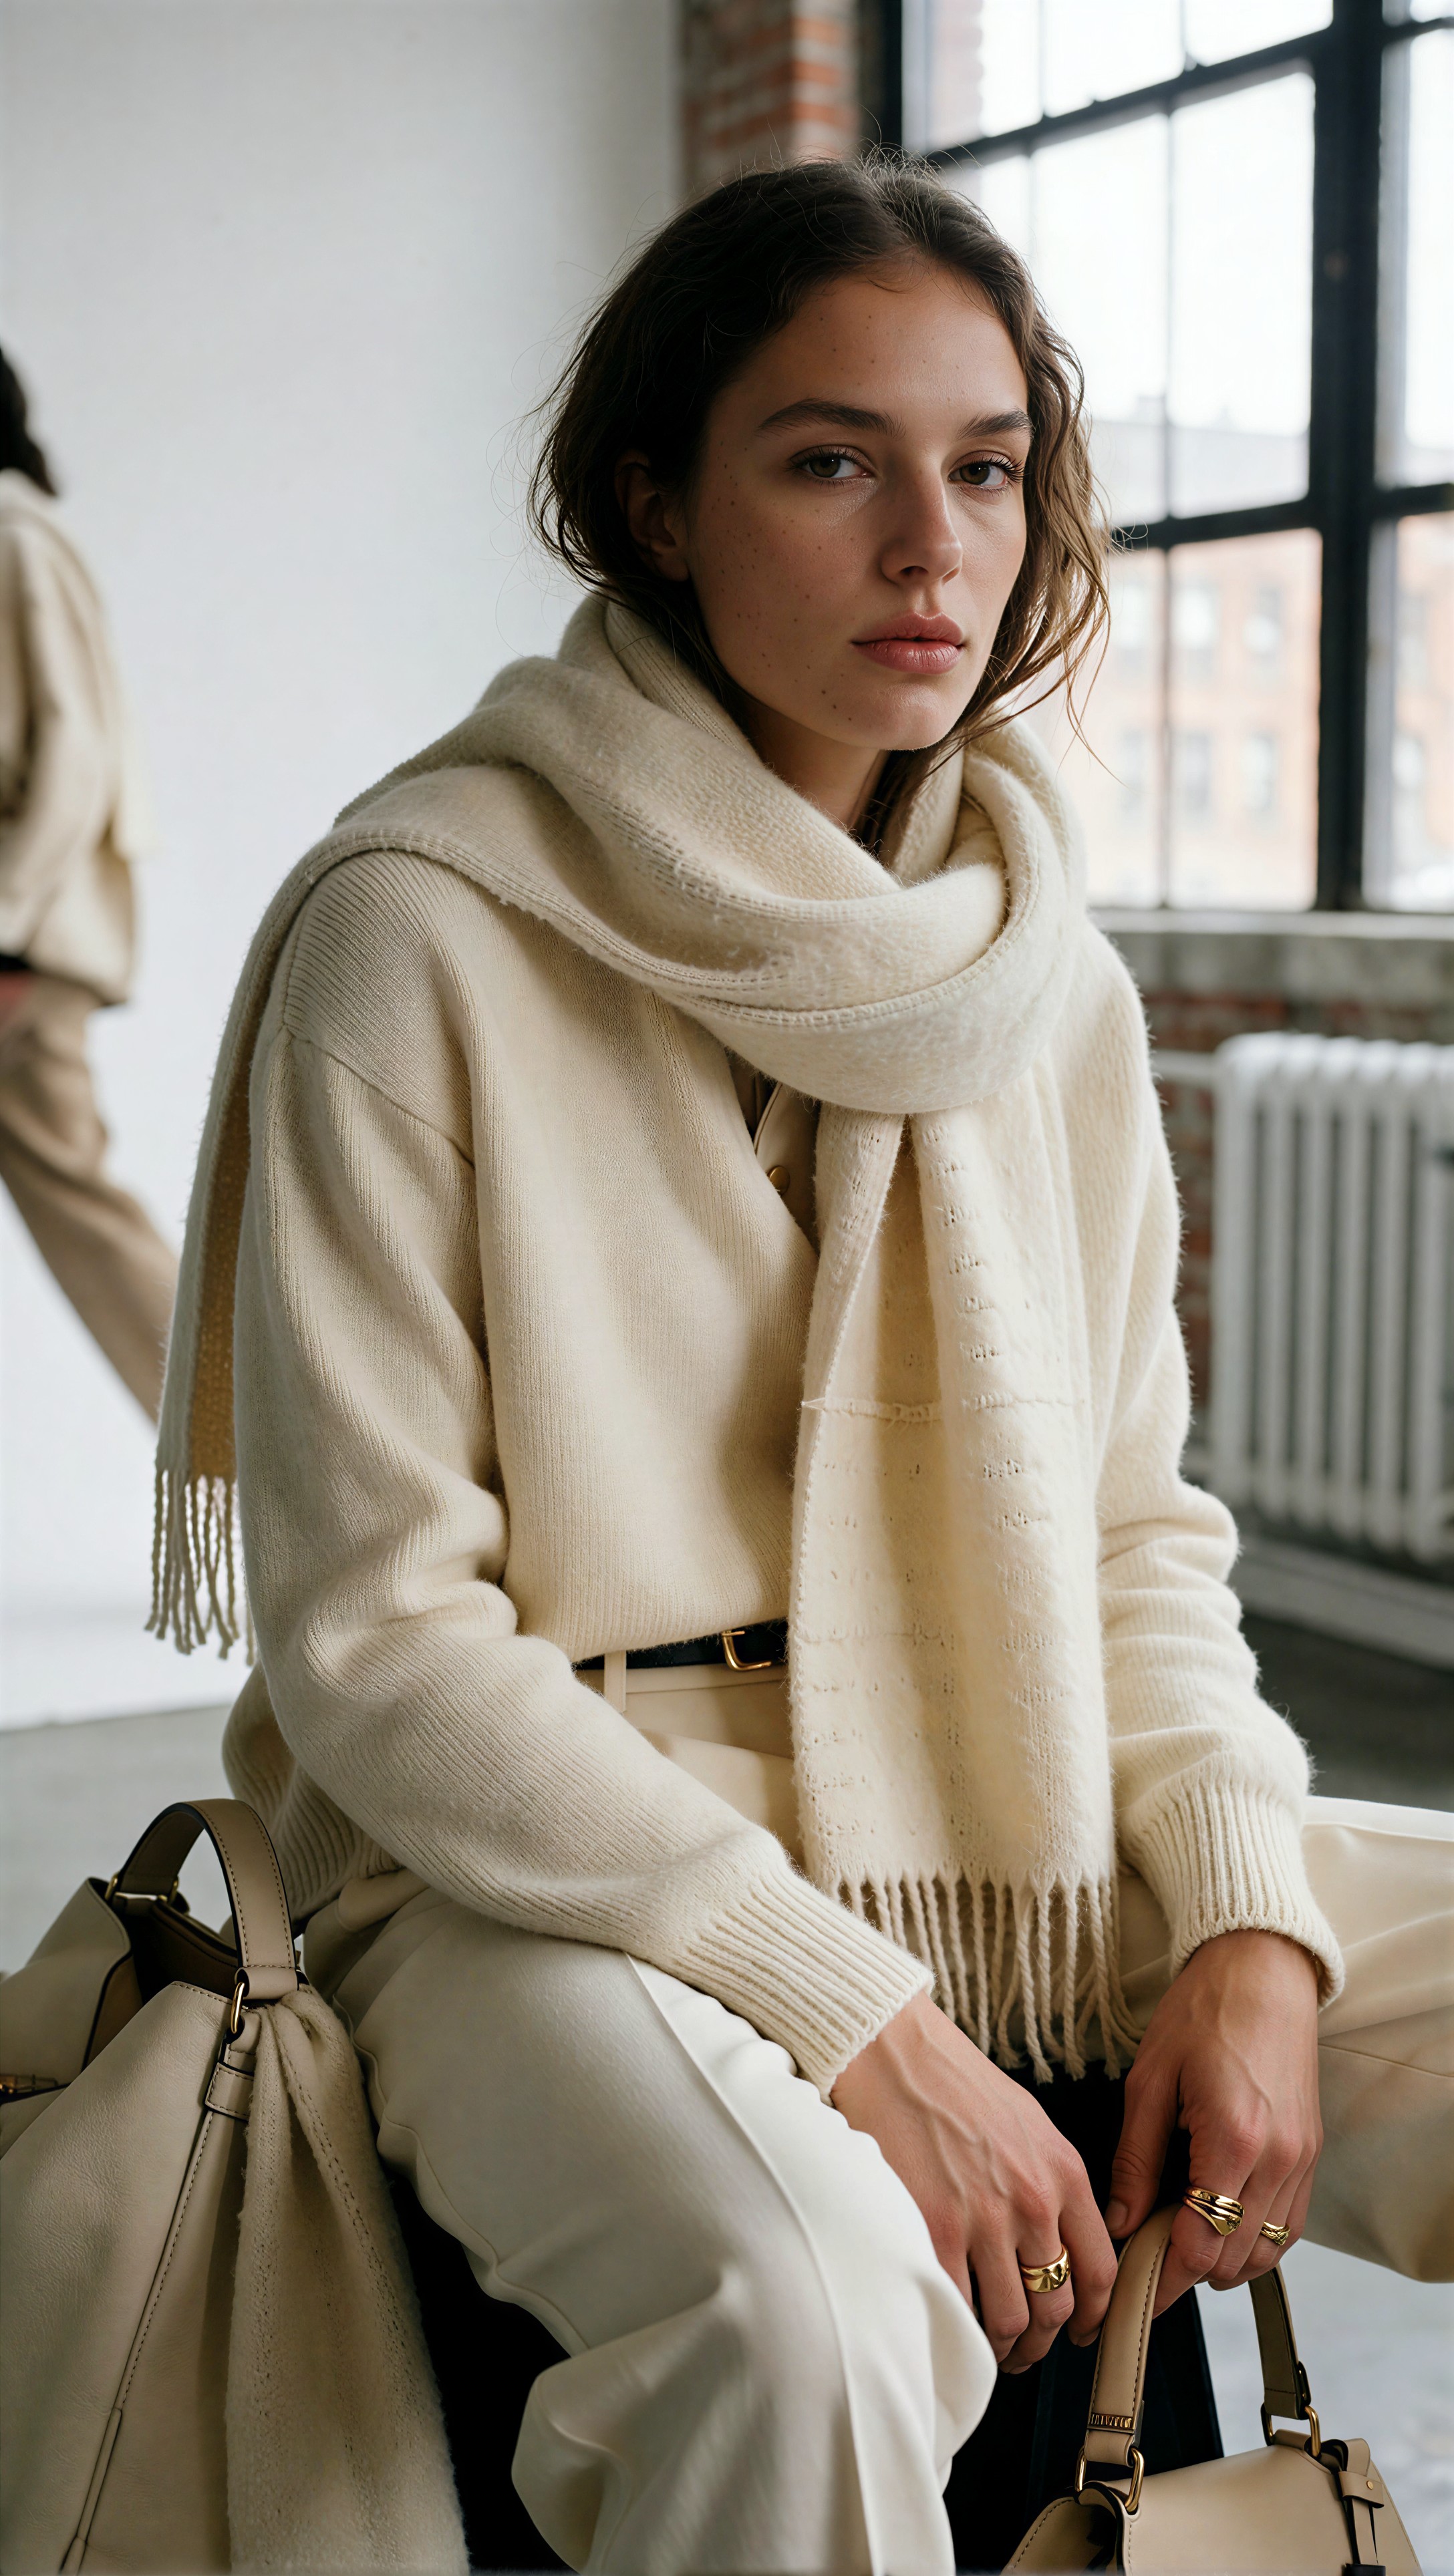
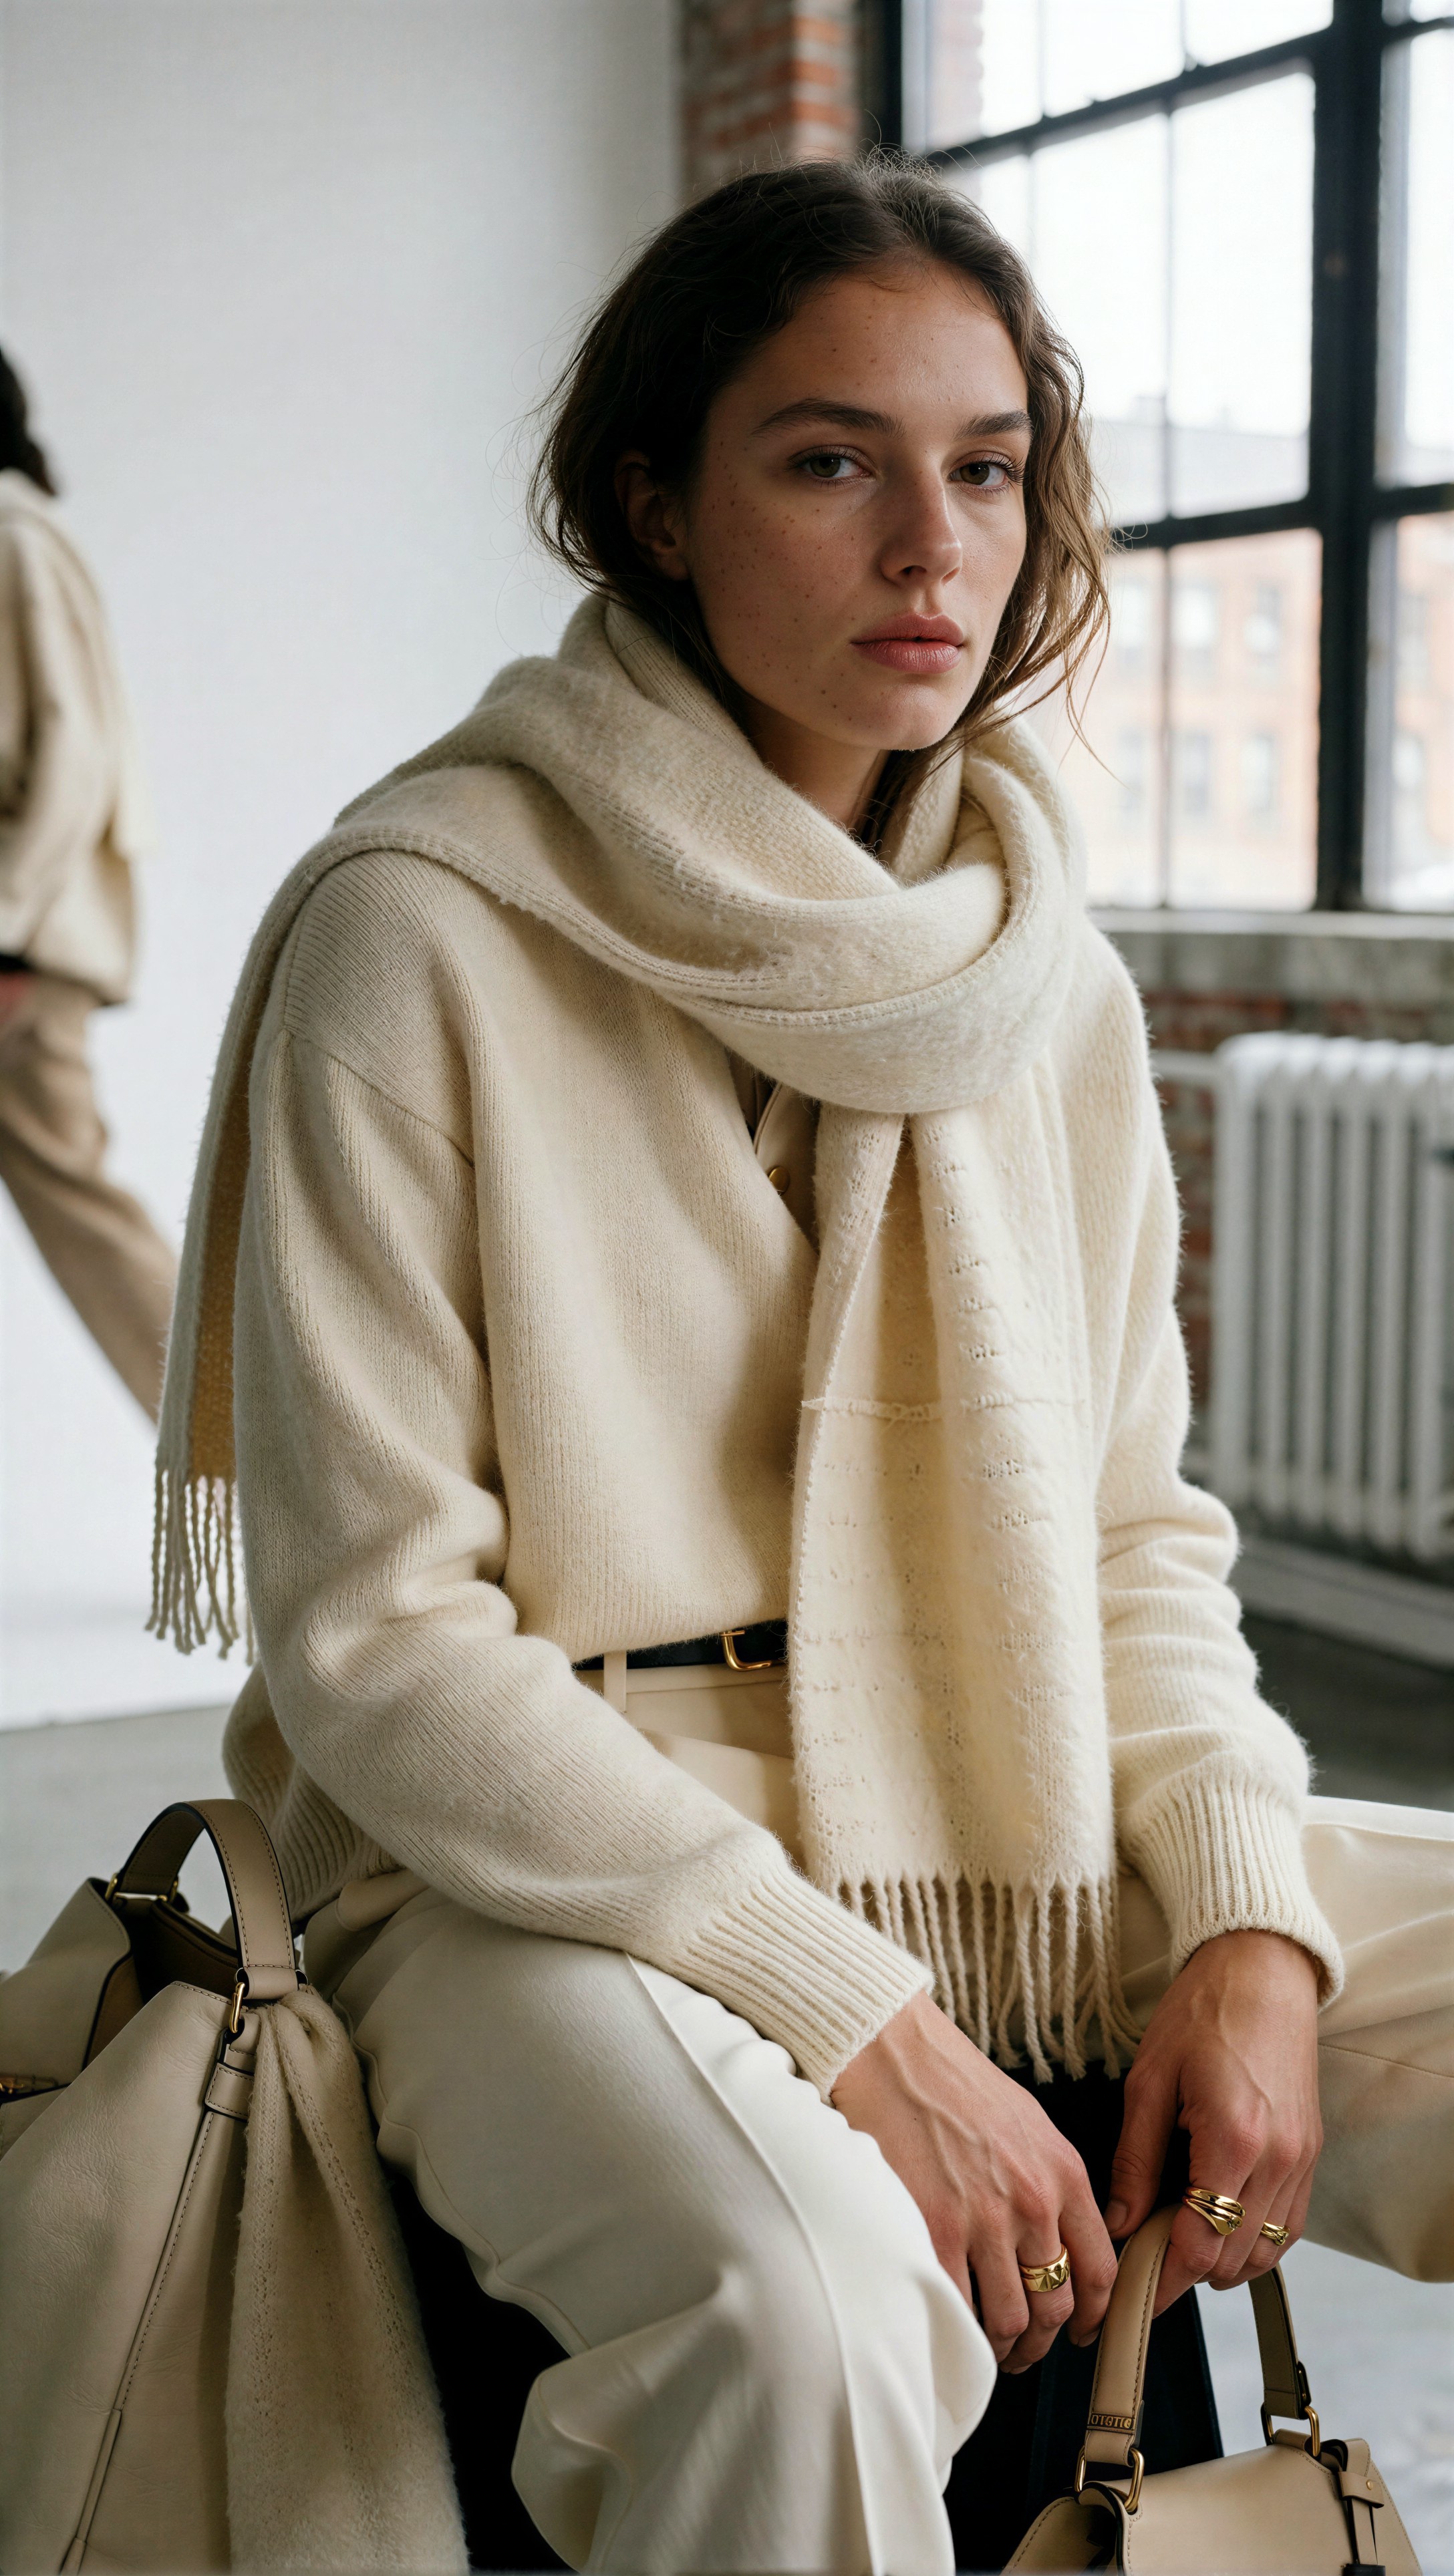
Inspect the cheek highlight and forehead transition. False detail usually shows up there first as uniform grain or an over-etched texture pattern.
Fabric texture and the risk of looking artificially crisp
Interestingly, 3B was often punchier on first look in clothing detail. Seams, ribbing, and weave structure could appear more obviously sharp. But in the best 7B crops, the texture felt more woven into the image rather than laid on top of it.
That distinction matters in fashion-oriented portrait work. A jacket weave should not outcompete the face. In this test, 7B generally kept fabric detail rich without disconnecting it from the scene’s overall softness. 3B sometimes nudged the outfit toward a more contrasty texture interpretation that looked good in thumbnails and less convincing in crops.
This fifth source-image test made garment texture the main challenge. It is useful when you need to know whether the upscaler respects weave and drape together instead of just sharpening everything equally.
Topic: Tailored fashion portrait with visible tweed, silk, and leather textures
Genre: Luxury Campaign
Camera: Leica SL2-S
Lens: 50mm f/2
Lighting: Large soft key with narrow rim light
Location: Paris editorial studio
Style: Luxury fashion campaign
Final Prompt: head-to-toe lookbook portrait of a model wearing a cropped tweed jacket over a silk shell, high-waisted wool trousers, pointed leather heels, structured mini bag, brushed metal cuff, polished but modern Paris editorial styling, large soft key light with subtle rim separation, neutral studio background, poised standing posture, full outfit visible, emphasis on tweed weave, silk drape, trouser crease, leather finish, and clean facial detail, elegant controlled color palette and premium campaign realism
Comparison image 5
The same Krea2 source image is used for both outputs: SeedVR2 3B on the left and SeedVR2 7B on the right.
| Krea2 source | SeedVR2 3B output | SeedVR2 7B output | | --- | --- | --- | | !Krea2 source Test 5 · manual-5 | !SeedVR2 3B Test 5 · manual-5 | !SeedVR2 7B Test 5 · manual-5 |
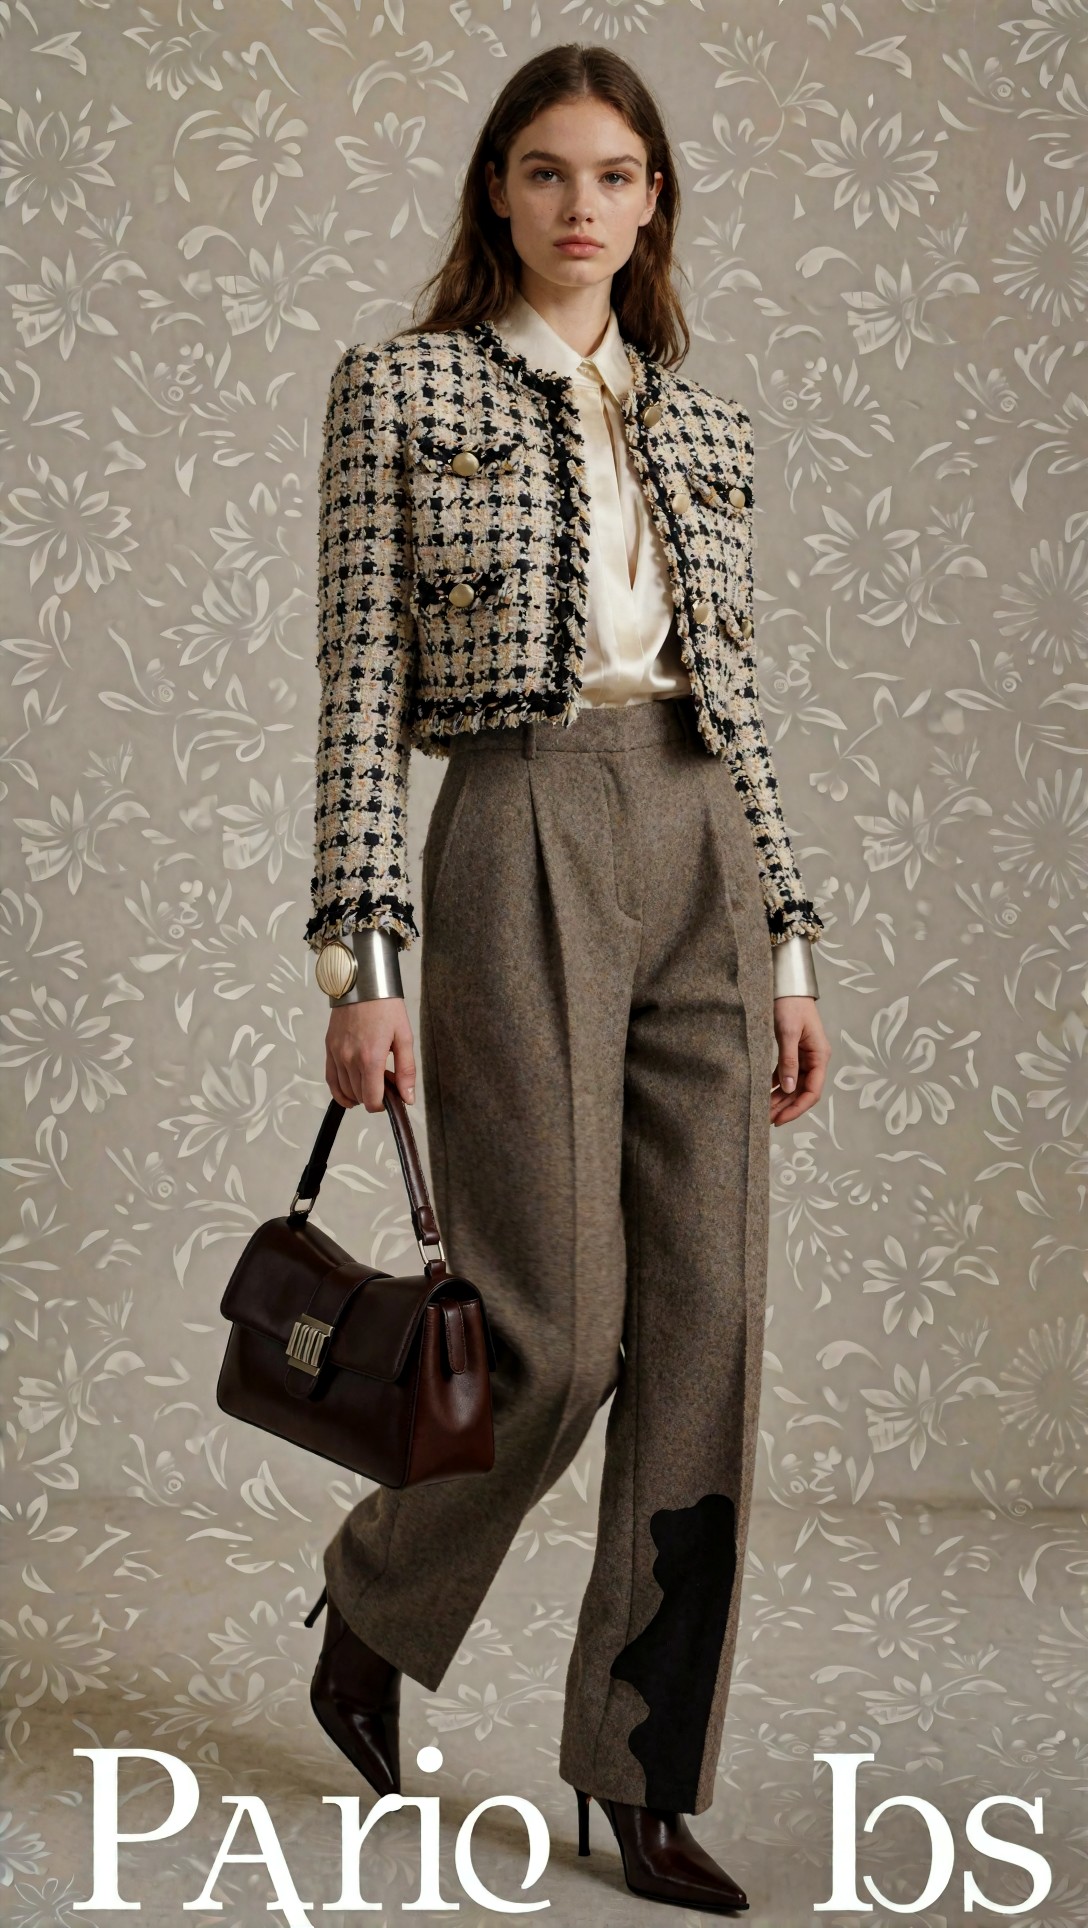
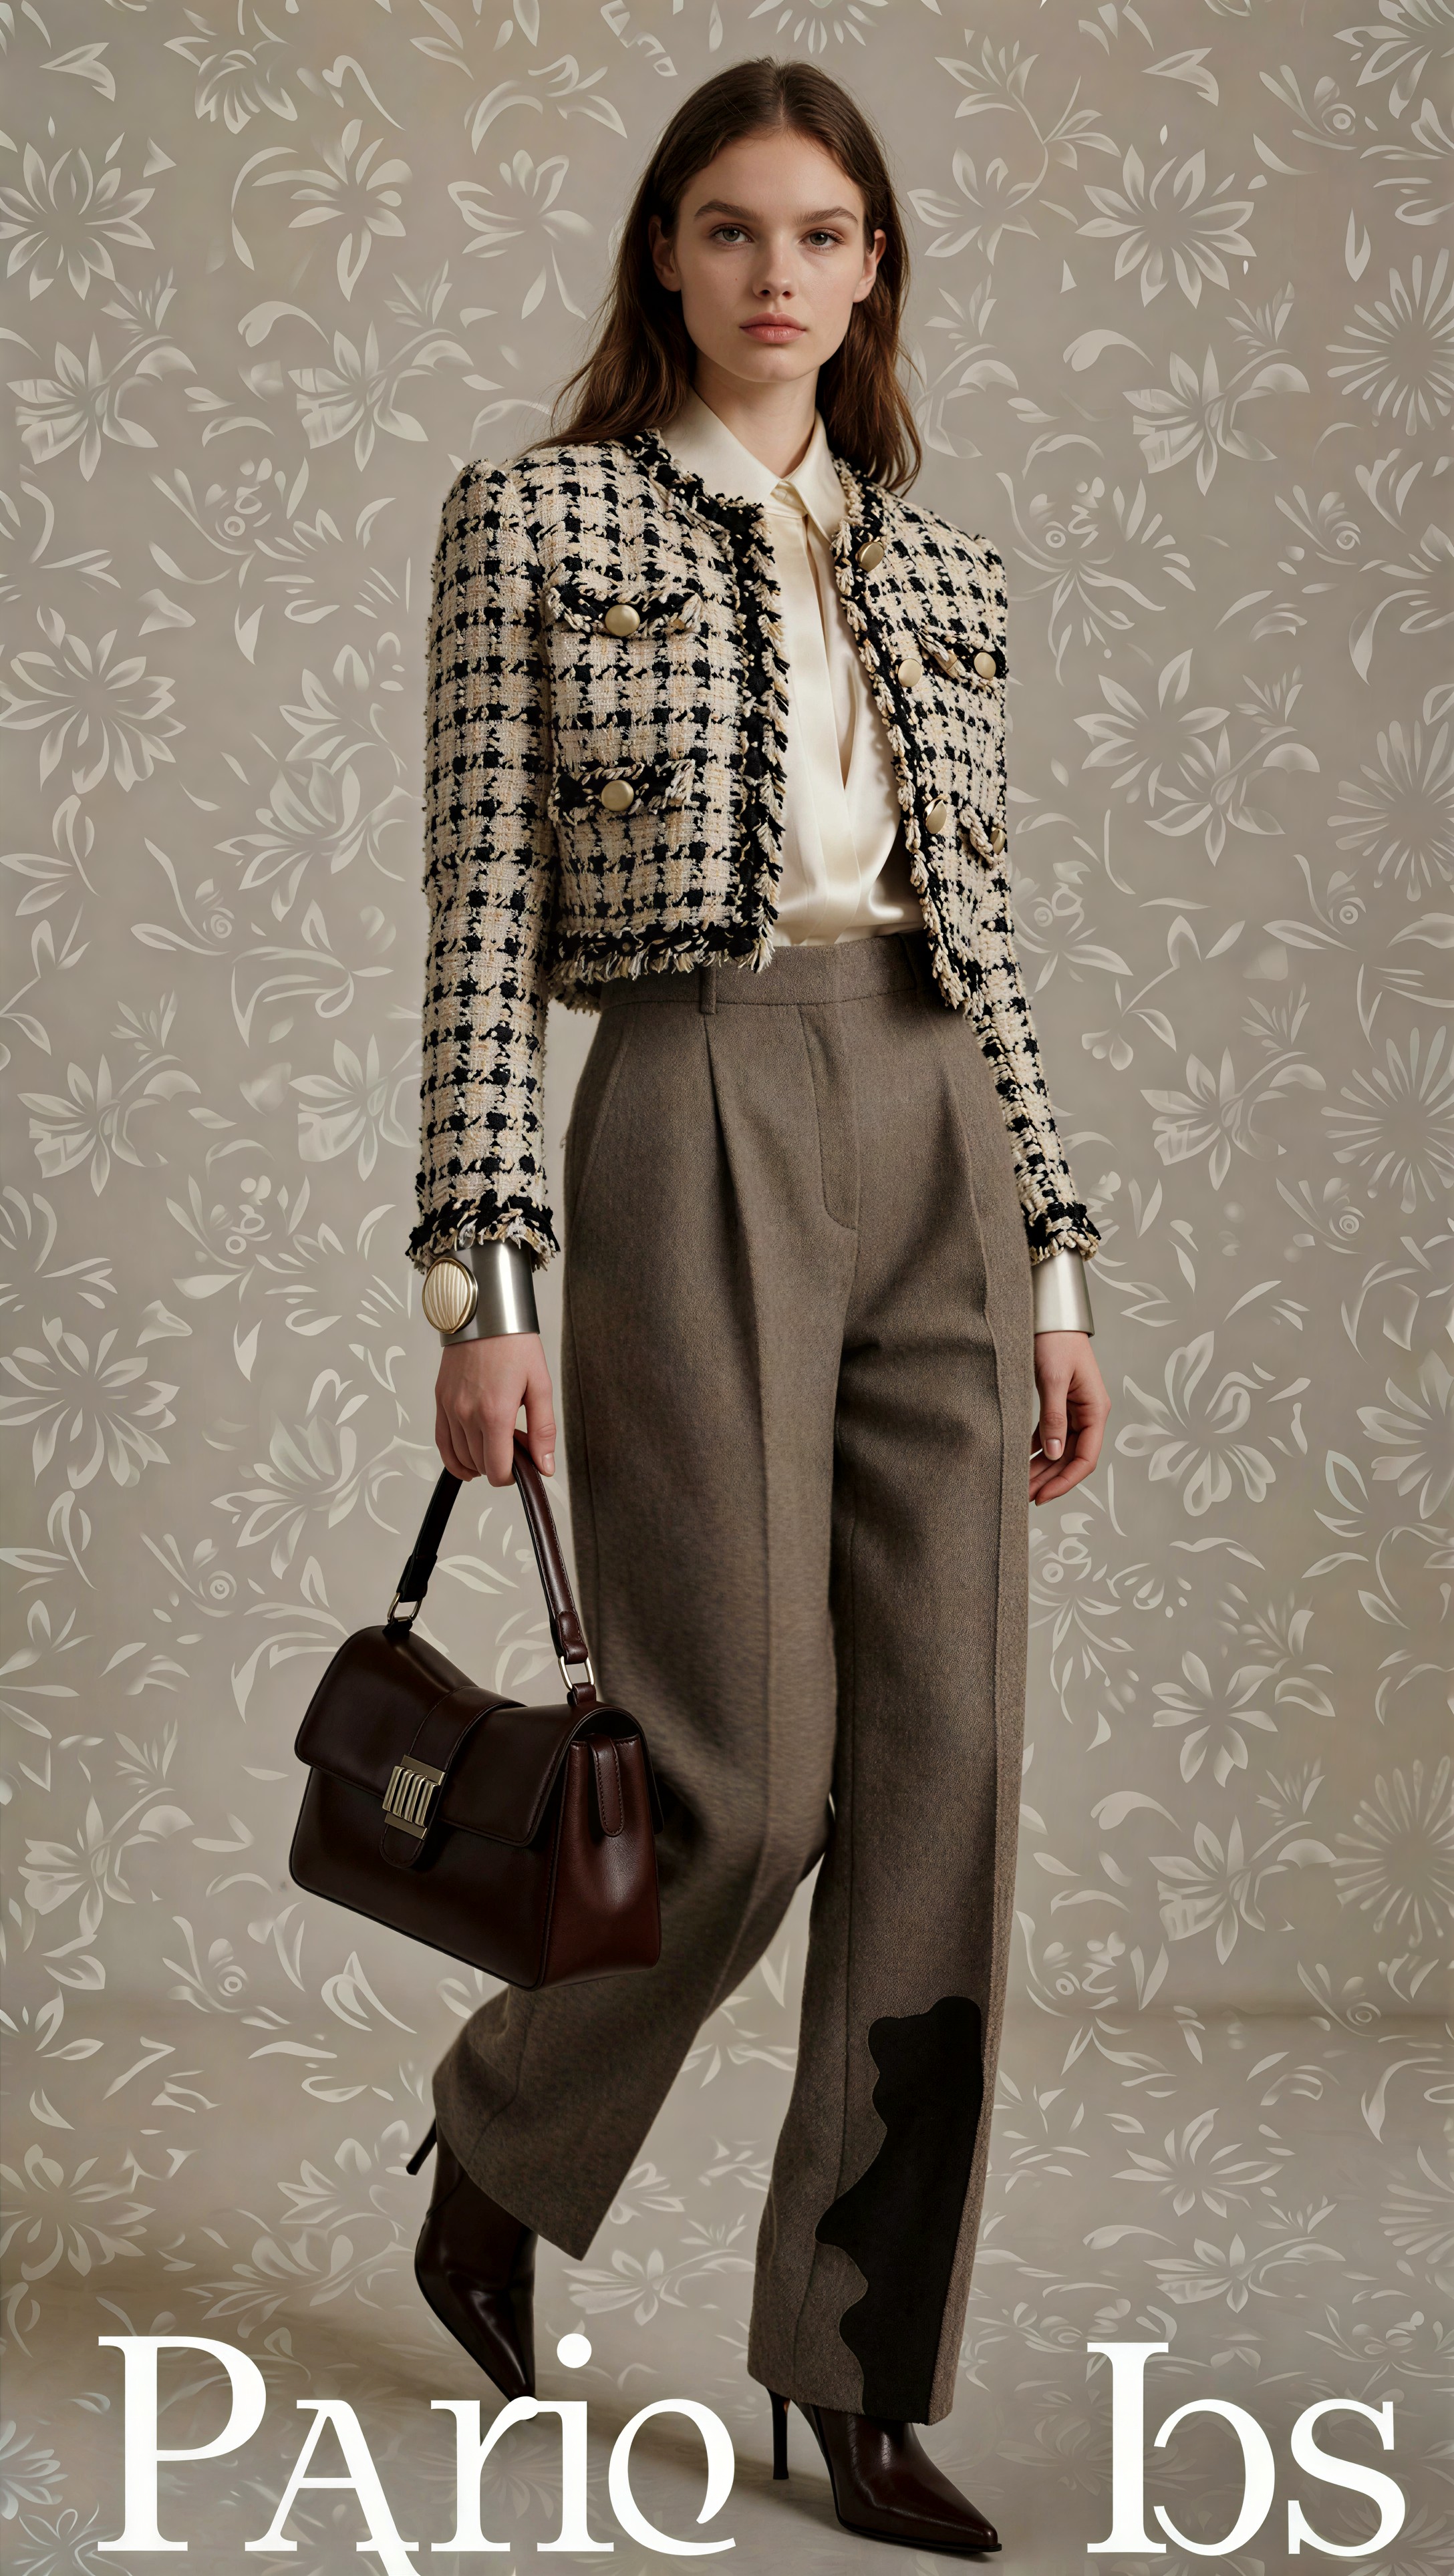
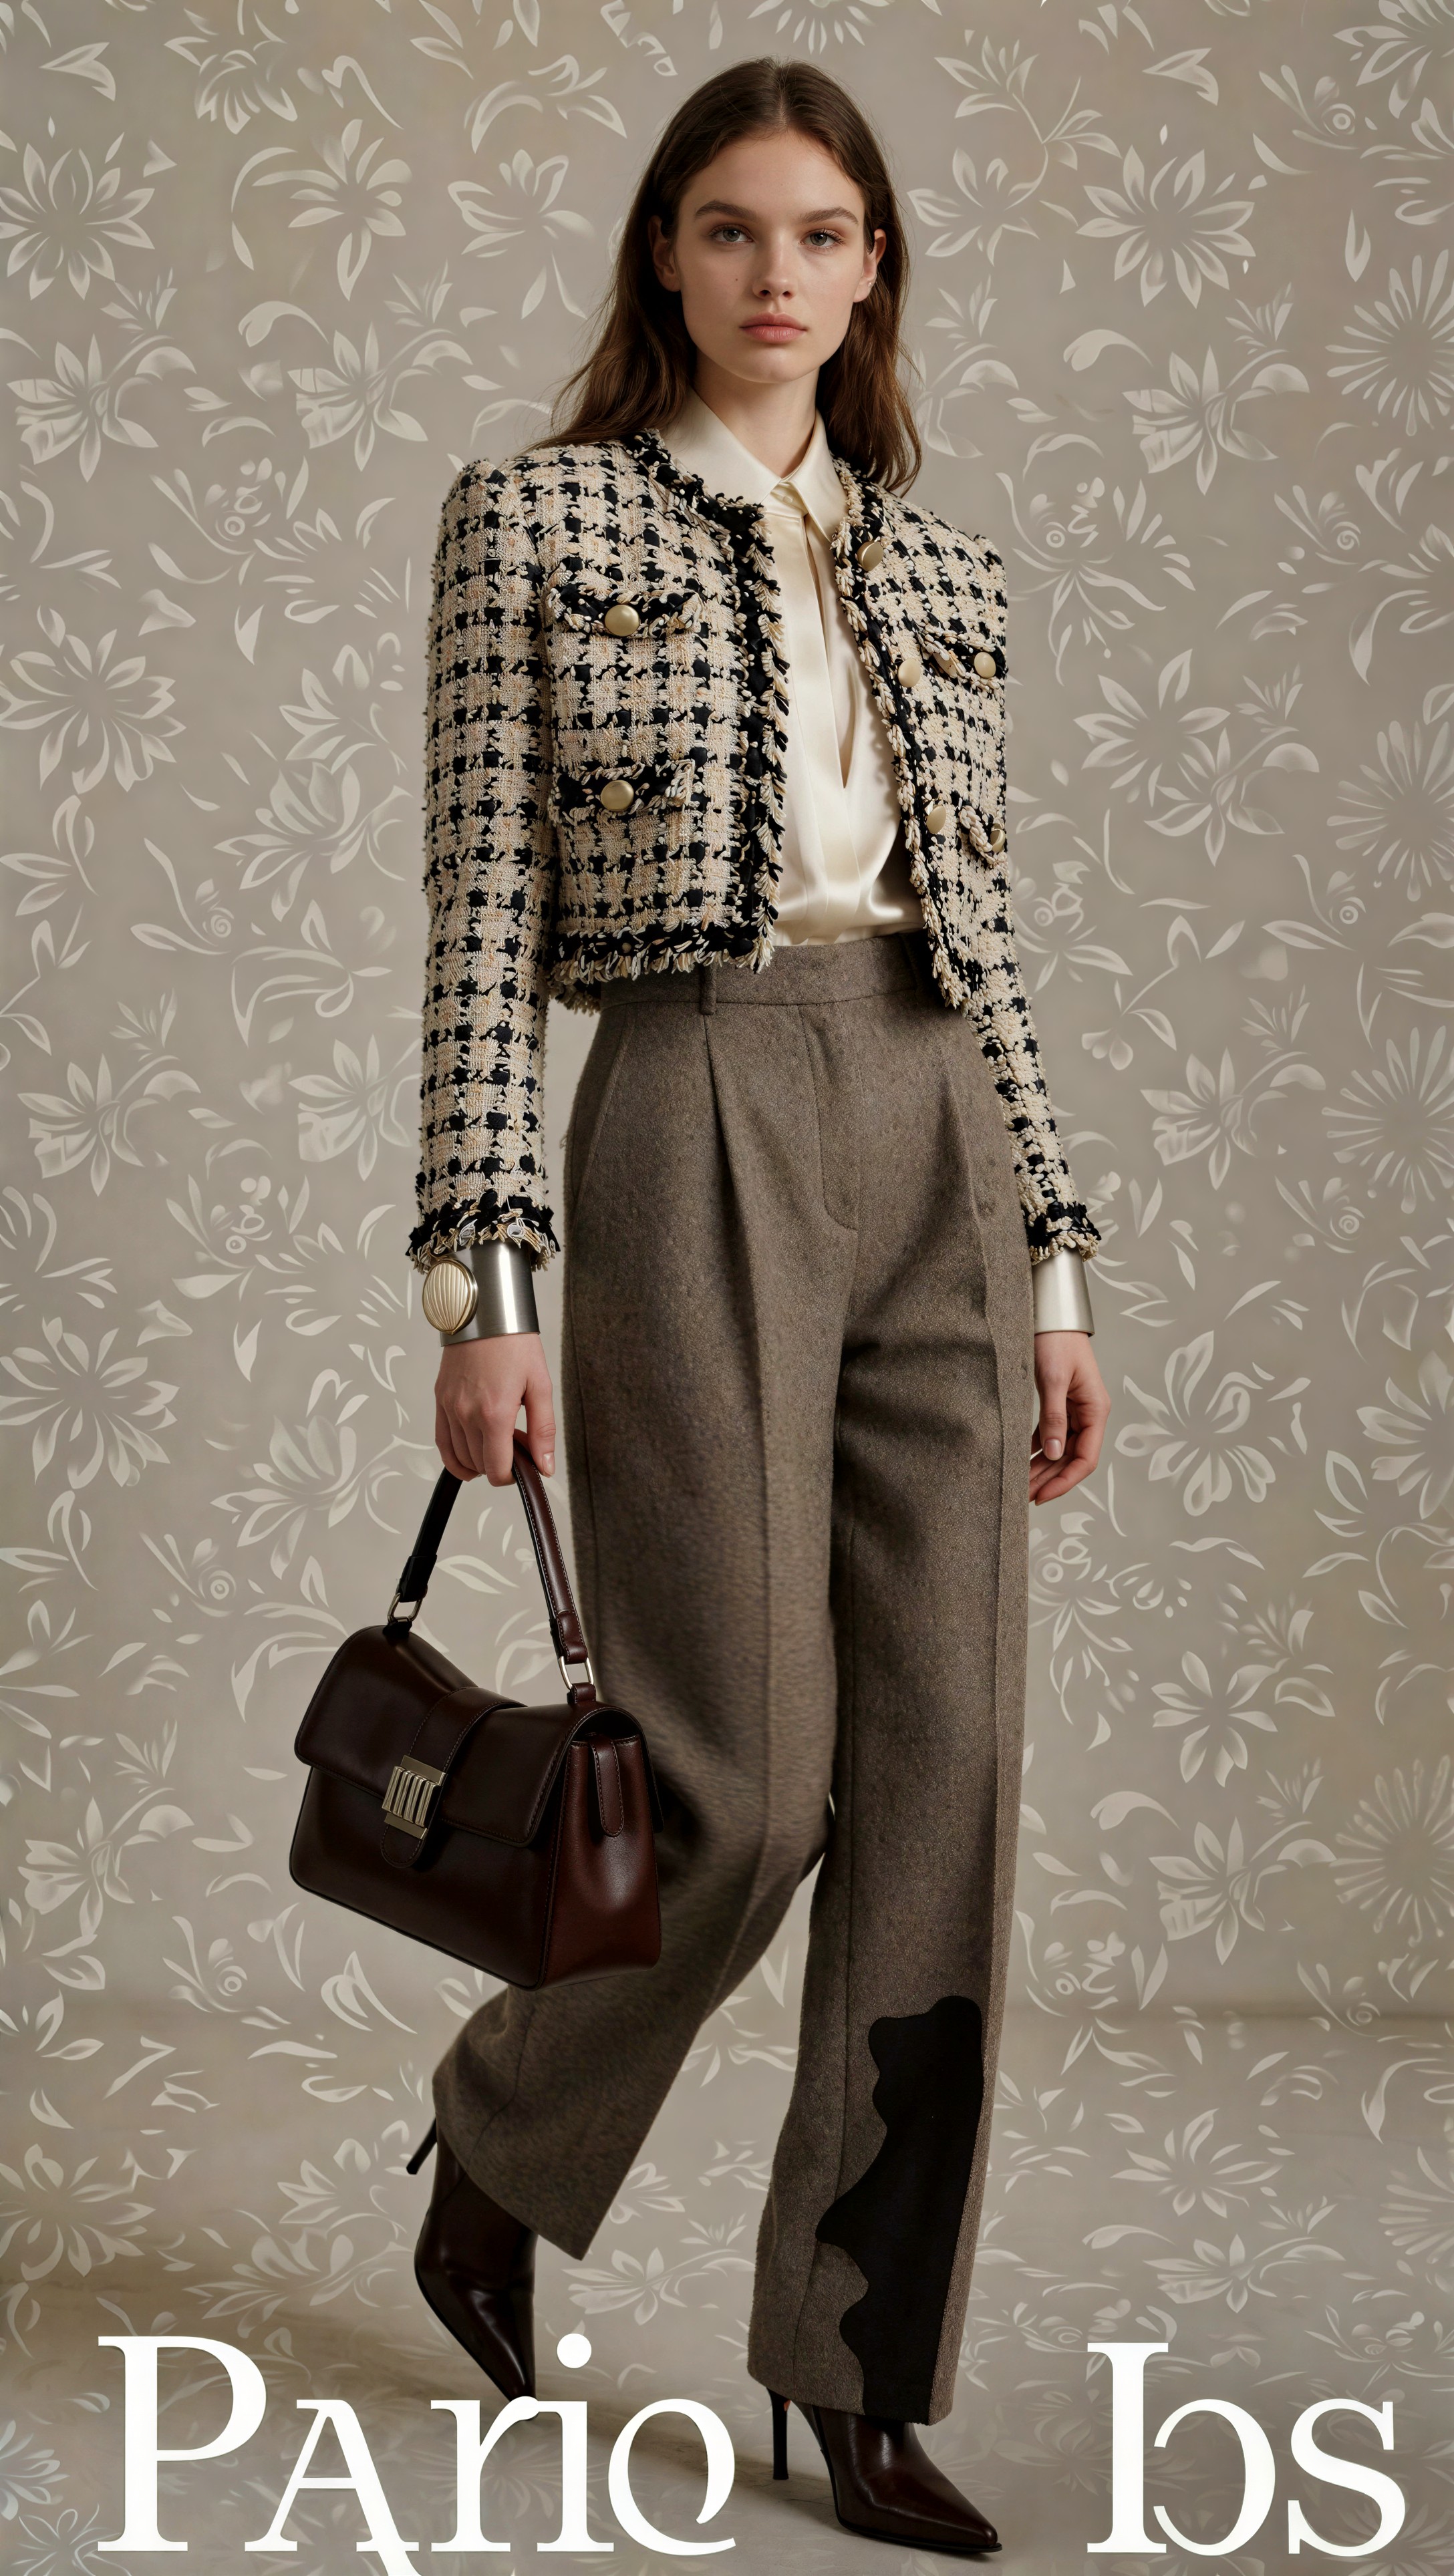
Zoom into the tweed and silk boundary. The stronger upscale keeps the materials distinct without making the tweed look brittle or the silk look plasticky.
Background cleanliness and contour stability
A clean background is unforgiving, which is why I like it for upscale tests. There is nowhere for edge mistakes to hide. In this portrait comparison, 7B generally produced cleaner transitions around the shoulder, ear, and outer hairline. It was less prone to subtle haloing and less likely to create tiny jagged edge decisions where the subject meets a flat tonal field.
This does not sound dramatic, but those edge issues are often what make an image feel “AI-upscaled” even when the center of the face looks fine.
This sixth test uses a cleaner retail-style setting so edge instability around silhouette and accessories is easier to spot. It also helps reveal small logo or typography risk if branded-looking elements appear.
Topic: Retail-inspired portrait with clean silhouette edges and accessory detail
Genre: Product Editorial
Camera: Panasonic Lumix S1R
Lens: 70mm f/2.8
Lighting: Soft studio panel light with subtle back edge light
Location: Minimal boutique interior
Style: Refined retail campaign
Final Prompt: storefront display inspired portrait inside a minimal boutique, model wearing a monochrome trench over a fitted top and straight-leg trousers, polished ankle boots, compact shoulder bag, slim scarf, trend-led neutral palette, clean merchandising background with shelving and negative space, soft panel light with subtle edge separation, clear outfit silhouette, realistic accessory materials, calm expression, crisp but natural subject-to-background boundaries, premium retail editorial finish
Inspect shoulder edges, bag strap lines, and any tiny printed marks or trim details. These are the places where distortion or haloing tends to show up first.
Side-by-side findings: 3B on the left, 7B on the right
If you are publishing comparison images, keep them horizontal. Do not stack them vertically. It is much harder to compare lashes, pores, and fabric texture when the eye has to travel up and down between differently scaled crops.
Use a two-column layout like this whenever image URLs are added:
| SeedVR2 3B output (left) | SeedVR2 7B output (right) | |---|---| | 3B full image or crop | 7B matching full image or crop | | Hair crop | Hair crop | | Eye crop | Eye crop | | Skin crop | Skin crop | | Fabric crop | Fabric crop |
And for the actual visual review, this is the comparison that best matched what I saw:
| Area inspected | SeedVR2 3B | SeedVR2 7B | |---|---|---| | Hair strands | Good outline sharpness, weaker strand hierarchy | Better flyaway separation and internal strand structure | | Eyelashes | Clear but can become a touch heavy | Cleaner separation, less forced contrast | | Skin pores | Present but occasionally etched | More natural pore distribution and softer roll-off | | Fabric detail | Punchy first impression | More believable material rendering | | Clean background edges | Mostly stable, some halo risk | Better contour consistency | | Artifact handling | Slight oversharpen tendency | Fewer visible synthetic edge cues | | Final delivery confidence | Good for general use | Better for close-inspection output | | Practical profile | Faster, lighter | Slower, heavier, more dependable |
Prompt examples tied to failure points
The next two prompt tests were built to expose specific upscale weak points: small repetitive texture and accessory-level edge cleanup.
This seventh test targets fine repetitive surfaces and layered styling. It is useful because repeated micro-patterns often trigger fake sharpening in smaller upscalers.
Topic: Editorial portrait with pleats, chain details, and layered accessories
Genre: Fashion Editorial
Camera: Canon EOS R3
Lens: 40mm f/2.8
Lighting: Soft daylight through scrim with silver bounce
Location: Milan showroom interior
Style: Contemporary European editorial
Final Prompt: three-quarter outfit editorial in a Milan showroom, model wearing a pleated midi skirt, fitted sleeveless knit, cropped leather jacket, chain belt, stacked bracelets, structured mini bag, pointed slingback shoes, trend-led tonal palette, relaxed standing pose near textured walls, scrim-softened daylight with silver bounce, visible pleat repetition, knit grain, leather finish, chain reflections, and clean facial detail, polished high-fashion editorial composition
Check whether repeated pleats remain distinct without becoming brittle lines. Also inspect metallic accessory edges for chatter or overdefined contours.
This eighth test is for close accessory and garment-detail review. It helps reveal whether the upscale handles tiny edge transitions with restraint.
Topic: Garment detail macro with collar edge, stitching, and hair crossover
Genre: Product Editorial
Camera: Hasselblad X2D 100C
Lens: 90mm f/2.5
Lighting: Controlled soft key with narrow top highlight
Location: Neutral campaign studio
Style: Precision luxury detail shot
Final Prompt: garment detail macro focusing on the upper torso of a styled fashion subject, visible structured collar, contrast stitching, fine wool texture, silk scarf knot, slim necklace, a few natural hair strands crossing the lapel, soft key light with a narrow top highlight, neutral campaign background, luxury product-editorial precision, extremely clear textile and accessory separation, elegant restrained palette, premium catalog-ready realism
Inspect the stray hairs crossing the collar. In weaker outputs they either disappear, fuse into dark marks, or produce halos where they meet stitching.
What to inspect before publishing the result
Before you export a final portrait upscale, use this checklist.
Quick publish checklist
- Compare the same original image after 3B and 7B, side by side
- Review at full resolution, not just fit-to-screen
- Crop into hairline, lashes, cheek texture, and collar edge
- Check if pores look natural or printed on
- Check if hair strands separate or clump
- Look for haloing against clean backgrounds
- Inspect logos, monograms, or small text if the outfit includes them
- Ask whether the file looks truly more detailed, or just more sharpened
When to use SeedVR2 3B
Use 3B when:
- you need a quicker, lighter portrait upscale
- the image is for normal gallery viewing rather than aggressive crop inspection
- you are processing multiple fashion or portrait frames and need a reliable first-pass filter
- the source already has strong clean detail and does not need maximum reconstruction
In this test, 3B was the practical admin choice. It answered the question, “Is this image worth finishing?” very quickly.
When to use SeedVR2 7B
Use 7B when:
- the portrait is a hero image
- viewers may zoom into face, hair, or garment detail
- identity retention matters in the eye area
- beauty or fashion styling depends on believable texture, not just apparent sharpness
- you want the cleanest final-gallery result with the lowest visible artifact risk
In this test, 7B was the strongest result for final delivery.
Limitations and failure risks
Neither model is magic. If the source portrait has weak eyelashes, muddy hair separation, or ambiguous skin detail, the upscale can only do so much. What changes is how gracefully the model interprets uncertainty.
The main risks I would still watch for in both versions:
- oversharpened skin on softly lit cheeks
- darkened lash bands that alter expression
- synthetic hair filaments at the contour
- fabric becoming too crunchy compared with face softness
- logo or text distortion on garments, bags, or jewelry details
If your workflow includes multiple portrait concepts, it helps to keep those problem cases organized alongside generation notes in [articles](/articles) or prompt experiments in [tools](/tools).
FAQ
Is SeedVR2 7B always better than SeedVR2 3B for portraits?
Not always in a practical sense. In this test, 7B was better for final image fidelity, but 3B remained useful for faster general portrait upscaling where close crop inspection was less important.
What is the main visible difference in SeedVR2 3B vs SeedVR2 7B portrait upscaling?
The main visible difference is in micro-detail behavior. 7B usually keeps hair strands, eyelashes, and skin texture more natural, while 3B can look a bit more sharpened or contrast-driven.
Should I compare 3B and 7B on different source images?
No. Use the same original image with the same 2x settings, then inspect the outputs side by side. That is the only fair way to see what the model choice changed.
Is 2x enough to show real differences?
Yes. On portraits, 2x is enough to expose hairline handling, lash reconstruction, skin texture behavior, and edge stability very clearly.
How should I lay out comparison images?
Horizontally, with SeedVR2 3B on the left and SeedVR2 7B on the right. Do not stack them vertically if the goal is fine-detail comparison.
Transferable lesson
The broad lesson from this case is simple: in portrait upscaling, the winner is rarely the model that looks sharpest first. It is the one that survives crop review without announcing itself.
For SeedVR2 3B vs SeedVR2 7B portrait upscaling, that meant 3B was the efficient working option and 7B was the safer finishing option. If your portraits include visible hair texture, soft studio skin, and fashion materials that need to stay believable together, inspect the same image side by side after both upscales. The hairline, lash edge, and cheek texture will tell you which file is ready.
Editorial conclusion: use SeedVR2 7B when the job is final-gallery portrait delivery and viewers may inspect hair strands, eyelashes, or skin texture closely. Use SeedVR2 3B when faster, lighter runs are more practical and the portrait only needs solid general-detail improvement. Avoid both as blind one-click choices: the setting that matters most is not just 2x itself, but the discipline of reviewing matched 3B and 7B crops side by side before publishing.
Why the same source image matters
An upscaler comparison only makes sense when the source image stays fixed. Each test uses the same Krea2 Turbo source render for both SeedVR2 3B and SeedVR2 7B, then compares the outputs side by side. That makes differences in hair edges, skin texture, fabric detail, and background stability easier to judge.
Comparison method
Each row starts from one source image. The left result is SeedVR2 3B and the right result is SeedVR2 7B. The goal is not only to see which image looks sharper, but also which one preserves the original character, skin texture, fabric detail, and fine edges more reliably.
Shared SeedVR2 source-image test condition
Use this same source-image/test condition for both SeedVR2 3B and SeedVR2 7B before comparing the output.
Use the same uploaded Krea2 Turbo portrait source image for both tests: detailed fabric texture, natural skin, soft studio light, strong hair detail, and a clean background at 1024px input. Apply the same 2x upscale settings in SeedVR2 3B and SeedVR2 7B so the comparison focuses on visible differences in skin texture, eyelashes, hair strands, fabric detail, edge stability, artifact handling, and any text or logo distortion risk.